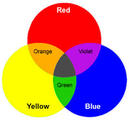
These days you are seeing many of the chefs switching from using artificial dyes to a more natural option. Below are recipes using natural ingredients for the 3 primary colors; yellow, blue and red. Now you can mix these primary colors to get greens, purples and oranges. The natural dyes tend to be more forgiving when mixing with your ingredients.
Yellow:
Turmeric Yellow Food Dye
Bring 4 tsp. ground turmeric, 1/3 c. sugar, and 2 cups of water to a boil in a small saucepan over medium low heat. Reduce the liquid by about half, it will take about 30 minutes. Let the dye cool before using. This makes about 1 cup.
Blue:
Cabbage Blue Food Dye
Bring 1/2 small head of red cabbage chopped coarsely, and 3 c. of water to a simmer in a medium saucepan. Cook until the cabbage is soft and the liquid is reduced to about a third (1 cup). This will take about 30 minutes.
After reducing, remove the cabbage and add 1/2 c. sugar to the cabbage liquid and simmer until very deep purple. reduce down to about 1 cup. Let the dye cool, then stir in 1/2 tsp. baking powder. This makes about 1 cup.
Red:
Beet Red Food Dye
Bring 3 Medium red beets, peeled and quartered. and 3 cups of water to a simmer. Cook the beets until they have lost their vibrant red color and the liquid is reduced by about a third, it will take about 30 minutes.
Remove the beets and add 1/2 c. sugar to the beet liquid and simmer. Reduce again to about one cup, it will take about 15 minutes. Let the dye cool before using, it will make about 1 cup.
How to use:
Mix the primary colors to get the secondary colors, the sky is the limit. These
dyes are perfect for tinting frosting that you can use on cakes, cookies even hard boiled eggs. They are safe for everyone since they are all natural.
If you have extra freeze the dye in ice cube trays, remove once frozen, and store in the freezer. That way if you need a small amount for a future project you will have it ready.
Source:
Bon Appetit
December 2016, Juno Demelo, recipes by Julia Everist
 RSS Feed
