Whole Grain 100
Email: wholegrain100@proton.me
  • Welcome
  • Price Sheet
  • Store & Classes
  • Baking Education
  • Recipes
  • Grain Education
  • Health & Nutrition

Bumper Tomato Crop?

7/24/2016

0 Comments

 
Picture
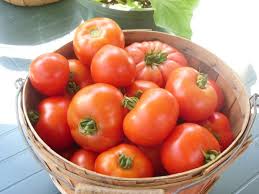
Your garden is overflowing with tomatoes and well you hate to waste them but, you need some easy ideas to put them to good use.


Grated Tomato Sauce
Servings: Makes about 3 cups
  • 3 pounds tomatoes ... use the not so perfect ones
  • Kosher salt
  • ½ cup olive oil
  • 4 garlic cloves, crushed
  • 4 small sprigs rosemary
  • 2 tablespoons unsalted butter

Preparation
  • Slice a thin round off the bottom of each tomato. Starting at cut end, grate tomatoes on the largest holes of a grater over a medium bowl until all that’s left is the flattened tomato skin and stem; discard. Season grated flesh with several generous pinches of salt.

  • Heat oil in a large skillet over medium. Cook garlic, tossing occasionally, until golden brown, about 3 minutes. Add rosemary and cook, tossing, just until fragrant and starting to brown around edges, about 1 minute. Reduce heat to medium-low, add tomatoes, and bring to a simmer. Cook, stirring often, until mixture is slightly thickened, 5–10 minutes. Remove from heat, add butter, and stir until melted. Taste and season with more salt as needed. 

  • Do Ahead: Sauce can be made 3 days ahead. Let cool; cover and chill.

Drying Your Tomatoes
Last year a friend of mine gave me a five gallon bucket of plum tomatoes, he said he had canned enough. I thought there is no way I have time to can all these so I brought out my dehydrator and made short order of all those tomatoes. They were perfect in breads, salads, and soups all winter long. I am hoping this year he has another bumper crop.

If you don't have a dehydrator simply slice them and arrange them on a wire rack set inside a sheet pan, and park them in a 200° oven overnight for easy dried tomatoes. Depending on how many you have you may only need to keep them in the oven a few hours.

Turn on Your Grill
Charring the tomatoes and vegetables adds sweetness and a touch of smoky flavor.

Grilled Salsa Roja
Servings: Make about 3 cups
  • 8 plum tomatoes, cored
  • ½ medium white onion
  • 4 serrano chilies
  • 3 garlic cloves, peeled
  • 1 cup (packed) cilantro leaves with tender stems
  • Kosher salt
Preparation
  • Prepare a grill for high heat. Grill tomatoes, onion, and chilies, turning occasionally, until lightly charred and fragrant, about 4 minutes for chilies and 6–8 minutes for tomatoes and onion. Transfer to a plate and let cool. 

  • Purée tomatoes, onion, chilies, garlic, and cilantro in a blender until mostly smooth and only small pieces remain; season with salt.

Now canning your tomatoes is always an option but who has the time!

Source:
Bon Appetit

0 Comments

Building a Better Salad

4/20/2015

0 Comments

 
The other day I went to lunch with a friend and ordered a side salad with my sandwich. It was the best salad I have had in a long time. I expected just a simple salad, and wow what a treat. I eat salads often, they are good for you but, lets face it, they can get pretty boring. I came across an article in Bon Appetite on how to build a better salad and I thought I would share the information with you.

You can use this technique with any greens you are eating. First start with vegetables, all kinds and treat them differently, by shaving, or dicing this adds interest. Add crunch with nuts or seeds. Then make sure everything is lit up with an acid like lemon juice. Finally a dose of creaminess to top it off.


Little Gem Salad with Lemon Cream and Hazelnuts

Servings (4)

4 garlic cloves, smashed
1/2 c. heavy cream
kosher salt
1/2 tsp freshly ground pepper
1/4 c. blanched hazelnuts
4 small carrots, scrubbed
6 heads little gem lettuce
3 T. olive oil
2 T. fresh lemon juice divided
1/2 c. mint leaves
1 1/2 oz. Parmesan shaved

Instructions:
1.Cream- Combine the garlic and cream in a small bowl. Season with salt and 1/2 tsp. pepper. Cover and chill 1 hour.
2. Nuts- Toast the nuts on a baking sheet in a 350 degree oven. Toss occasionally until golden about 8-10 minutes.
3. Vegetables- slice the carrots in thin length wise strips.
4. Dressing- Strain the infused cream into a medium bowl and add the oil. Whip to very soft peaks. then whisk in 1T. lemon juice. Taste and season with more salt and pepper if needed.
5. Bring it Home- Toss the carrots, lettuce, mint leaves, and half of the hazelnuts with the remaining 1 T. lemon juice in a large bowl. Season with salt and pepper. Add a few dollops of lemon cream and gently toss to coat. Spoon remaining lemon cream onto a platter and mound the salad over. Top with cheese, remaining hazelnuts and some cracked pepper and sea salt.

Philosophy of Dressing the Salad
- The idea is to layer the dressing components onto the salad in parts so no flavors get lost. Ditch the bowl and plate your salad on a platter.

Here is how to do it:

Step 1. Acid comes fist so the produce can absorb the flavor before being coated in oil. Douse each ingredient layer with citrus juice or vinegar.
Step 2. Then comes the fat: a few drops of oil or dollop of cream or soft cheese to our the acid. It's the savory icing on a leafy cake
Step 3. Toss gently so the flavors merge yet stay distinct. You should be able to taste both the acid and the fat separately.
Step 4. Season aggressively! Sprinkle salt, pepper, or red pepper flakes all the way through.

Enjoy your salad, it does make a difference!
Recipe from Bon Appetite
0 Comments

The Best Way To Keep Herb Fresh

1/21/2015

0 Comments

 
Picture
Fresh herbs are wonderful but after you buy them keeping them fresh is a challenge. There are some tricks that will help your herbs last longer in the refrigerator.


1. Remove Them From The Package:

As soon as you get your herbs home, remove then from the packaging and take off the rubber bands or ties to prevent damage. Don't wash them until your ready to use them . Most fresh herbs prefer to be barely damp and will quickly turn on you if they are put away wet.

2. Basil and Mint:
Not  everything prefers to be in the refrigerator both basil and mint will do better stored at room temperature out of direct sunlight. Remove the package and trim off the bottom of the stems, and place in a glass with about 1 inch of cool water in the bottom. Make sure the water is deep enough to cover the bottom of the stems. Next cover the leaves with a plastic bag and place on the counter out of direct light.

3. Most Other Herbs:
Most other herbs prefer a slightly damp environment. Wrap the non washed herbs in a barely damp paper towel or light weight dish cloth and store in an airtight container ( baggie)  in the refrigerator. Check every few days and moisten as needed they will last up to 2 weeks.

4. Have Too Many Herbs:
More herbs than you will ever use, is a problem many would like to have, but how to keep them from spoiling is an issue. A good method is to preserve them in olive oil. Start by washing and drying them, then finely chop and combing them with a little olive oil. Freeze them in ice cube trays. When you need them just pop them out and add them to sauce, salad dressings or a rub. You will have herbs all year long.

5. Drying your extra herbs:
Not everyone has a dehydrator but almost everyone has a microwave and it will do a fine job of drying extra herbs you may have. The key when using a microwave is to monitor the process closely, so you can adjust the time and power level accordingly.

Drying in Microwave:
1. First, separate the leaves from the stems, rinse them if necessary, and air dry.

2. Place a single layer of leaves on a paper towel on a microwave-safe plate. Lay another paper towel on top, and      microwave on high for 30 seconds.  Watch the herbs continually during the drying process, and stop the oven if you smell the herbs burning.

3. If needed, repeat the heating for 30 seconds at a time until the herbs are fully dry.

Because of their relatively low moisture content, herbs are about the only thing that can be dried successfully in a microwave oven. Other foods, such as tomatoes or berries, contain too much moisture and wind up cooked rather than dried.

Picture
0 Comments

How To Ripen A Pineapple Perfectly

1/21/2015

0 Comments

 
Picture
We have been eating pineapples more often since Walmart price matches Aldie's  advertised price. When you can buy a pineapple for around $1.00 it's a great value.


Tip:

First pick the  heaviest pineapple in the bunch, it doesn't matter if it's green. Take it home and if you have a heavy vase turn the pineapple upside down top and all, into the vase and put it on the counter. I couldn't  find a vase large enough to fit the green leaves in so I used a milk jug and cut the top off it. In order to allow some air circulation around the  pineapple top. I then cut slits in the sides at different heights to retain some of the strength of the milk jug. Turning the pineapple upside down allows it to ripen faster and more evenly.

How To Know When It's Ripe:
When you smell the pineapple and it's yellow in  color from bottom to top it is ready to cut. It will have a slight give to the skin but the color and the smell is a better indicator. Cut it up according to the directions and put it into the refrigerator. What a treat, fresh pineapple, I use to cut it way to early and it never really ripened after cutting. This trick works great and is easy to do.

Enjoy Tamara

0 Comments

    Baking Education

    Cooking Tips & Shortcuts

    Archives

    October 2020
    February 2019
    August 2018
    June 2018
    March 2018
    March 2017
    November 2016
    September 2016
    July 2016
    May 2016
    April 2016
    March 2016
    February 2016
    January 2016
    December 2015
    November 2015
    October 2015
    September 2015
    August 2015
    July 2015
    June 2015
    May 2015
    April 2015
    March 2015
    January 2015

    Categories

    All
    Baking Tips
    Candy
    Converting Recipes
    Equipment
    Food Coloring
    Gifts
    Gluten Free Tips
    Herbs & Spices
    Ice Cream Tips
    Leavening Agents
    Meats & Eggs
    Oils
    Pie Tips
    Pie Tips
    Preserving Food
    Thickening Agents
    Tips On Produce

    RSS Feed

Powered by Create your own unique website with customizable templates.