Whole Grain 100
Email: wholegrain100@proton.me
  • Welcome
  • Price Sheet
  • Store & Classes
  • Baking Education
  • Recipes
  • Grain Education
  • Health & Nutrition

Silicone Non Stick Mats "Silpat"

1/21/2015

0 Comments

 
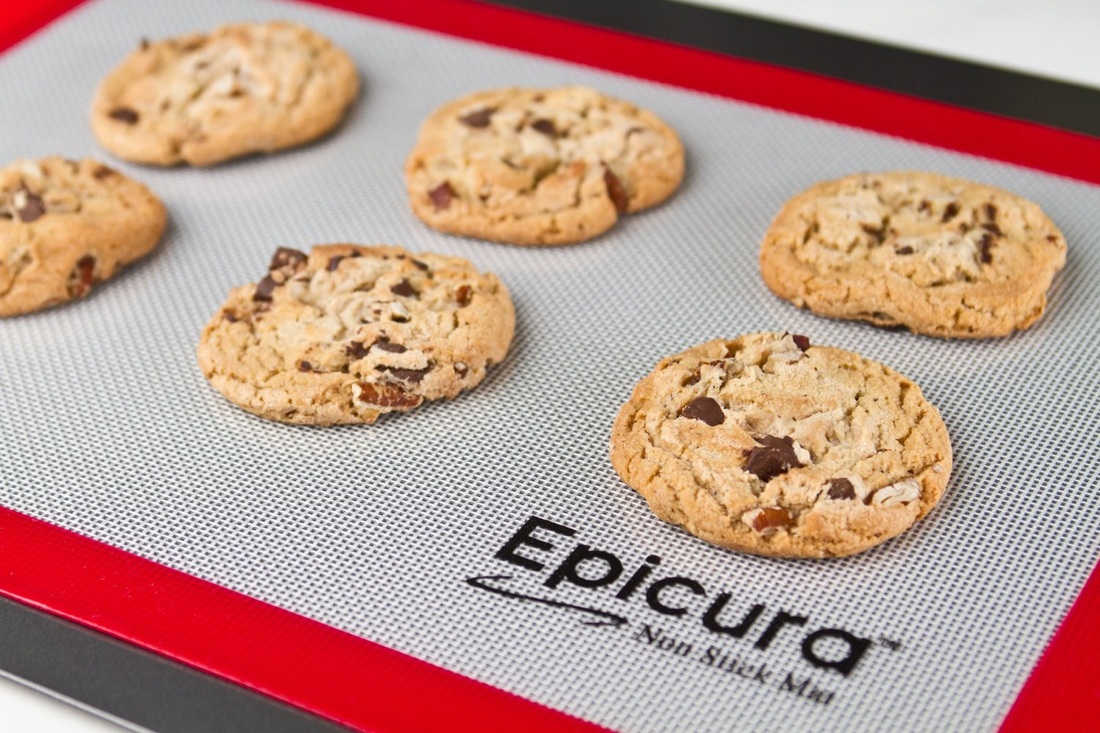
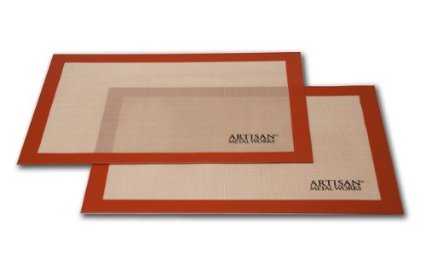
A flexible silicone baking mat is a nice kitchen tool that will make your life easier when baking. "Silpat" is one brand name, but there are many on the market. A silicone mat is one tool that's not expensive but you will use again and again. "Silpat" non-stick baking mats are made in France, they are very durable and are made out of meshed silicone. They come in may sizes to fit all types of baking sheets. When my husband bought ours, I thought do I really need this? I thought my cookies come out just fine, and my baking sheets work great. It only took me one bake to realize what a difference the mats make in my final product and clean up is a breeze.

The non-stick, flexible silicone mat replaces parchment paper and greasy sprays when used on your baking sheets. The mat dissipates heat rapidly to prevent the bottoms burning of your cookies or pastries. Your cookies will come out evenly baked every time. They will  also be shaped better, which gives you a more professional appearance of your finished product.

The mats are also a great time saver. When I bake cookies, I put the mat on the cookie sheet and place the cookie dough on the mat, then into the oven it goes. While it's baking I will take the next mat and place the cookie dough on it ready to go into the oven. When the first batch of  cookies are done you just remove the whole mat from the pan and slide it onto the cooling rack. Now you are ready to slide the new loaded mat onto the pan and put into the oven. The cookies that are cooling on the mat will come right off with no mess or sticking at all. Repeat the process until all the cookies have been baked.

Bed Bath and Beyond has generic flexible silicone mats at around $15.00 and the "Silpat" mats on Amazon are around the same price. We have had our  mats for around 7 years and they are in good shape and will last many more years. These make great gifts for someone in your life that loves to bake.
Picture
Picture
0 Comments

Freeze Your Extra Eggs

1/21/2015

0 Comments

 
Picture
Yes you can freeze your eggs and they taste nearly the same after they have thawed. You can fry them, bake with them or add them to casseroles or other recipes.


This is a fantastic way to stock up on eggs when they are on sale, or a great idea to use them up when you have some that are about to expire.  When you see eggs on sale go ahead and buy extra.

How to Freeze Whole Eggs
You can crack the eggs into a muffin tin, plastic egg crate or even ice cube trays. You just crack the eggs and add to the container without using any kind of spray or oil. Then place the tray into the freezer and freeze until the eggs are frozen solid. Once they are frozen you can remove the eggs from the container. If they are stuck just have the container sit in some warm water for a minute and they should pop right out.  I have found the best option for me, is to freeze the eggs in the silicone cup cake pans, you can get them at Walmart pretty cheap. After you freeze the eggs, then just turn  the pan inside out and the eggs pop out. Then add them to a gallon sized freezer safe bag. You can keep them frozen for up to a year. When you are ready to use them just take out the number of eggs needed and allow to thaw at room temperature. You can use them with any recipe that requires a whole egg such as baking, breading chicken, scrambled eggs, french toast, etc.

Separating the Egg Whites
If your recipe calls for just egg whites then it's best to separate the eggs before you freeze them. You can crack your eggs and separate the whites into one silicone cup and the yolk into another. Then after they are frozen add them to separate freezer safe bags. The holidays are coming up and baking season is just around the corner, stock up on eggs when they go on sale.

0 Comments

The Best Way To Keep Herb Fresh

1/21/2015

0 Comments

 
Picture
Fresh herbs are wonderful but after you buy them keeping them fresh is a challenge. There are some tricks that will help your herbs last longer in the refrigerator.


1. Remove Them From The Package:

As soon as you get your herbs home, remove then from the packaging and take off the rubber bands or ties to prevent damage. Don't wash them until your ready to use them . Most fresh herbs prefer to be barely damp and will quickly turn on you if they are put away wet.

2. Basil and Mint:
Not  everything prefers to be in the refrigerator both basil and mint will do better stored at room temperature out of direct sunlight. Remove the package and trim off the bottom of the stems, and place in a glass with about 1 inch of cool water in the bottom. Make sure the water is deep enough to cover the bottom of the stems. Next cover the leaves with a plastic bag and place on the counter out of direct light.

3. Most Other Herbs:
Most other herbs prefer a slightly damp environment. Wrap the non washed herbs in a barely damp paper towel or light weight dish cloth and store in an airtight container ( baggie)  in the refrigerator. Check every few days and moisten as needed they will last up to 2 weeks.

4. Have Too Many Herbs:
More herbs than you will ever use, is a problem many would like to have, but how to keep them from spoiling is an issue. A good method is to preserve them in olive oil. Start by washing and drying them, then finely chop and combing them with a little olive oil. Freeze them in ice cube trays. When you need them just pop them out and add them to sauce, salad dressings or a rub. You will have herbs all year long.

5. Drying your extra herbs:
Not everyone has a dehydrator but almost everyone has a microwave and it will do a fine job of drying extra herbs you may have. The key when using a microwave is to monitor the process closely, so you can adjust the time and power level accordingly.

Drying in Microwave:
1. First, separate the leaves from the stems, rinse them if necessary, and air dry.

2. Place a single layer of leaves on a paper towel on a microwave-safe plate. Lay another paper towel on top, and      microwave on high for 30 seconds.  Watch the herbs continually during the drying process, and stop the oven if you smell the herbs burning.

3. If needed, repeat the heating for 30 seconds at a time until the herbs are fully dry.

Because of their relatively low moisture content, herbs are about the only thing that can be dried successfully in a microwave oven. Other foods, such as tomatoes or berries, contain too much moisture and wind up cooked rather than dried.

Picture
0 Comments

How To Ripen A Pineapple Perfectly

1/21/2015

0 Comments

 
Picture
We have been eating pineapples more often since Walmart price matches Aldie's  advertised price. When you can buy a pineapple for around $1.00 it's a great value.


Tip:

First pick the  heaviest pineapple in the bunch, it doesn't matter if it's green. Take it home and if you have a heavy vase turn the pineapple upside down top and all, into the vase and put it on the counter. I couldn't  find a vase large enough to fit the green leaves in so I used a milk jug and cut the top off it. In order to allow some air circulation around the  pineapple top. I then cut slits in the sides at different heights to retain some of the strength of the milk jug. Turning the pineapple upside down allows it to ripen faster and more evenly.

How To Know When It's Ripe:
When you smell the pineapple and it's yellow in  color from bottom to top it is ready to cut. It will have a slight give to the skin but the color and the smell is a better indicator. Cut it up according to the directions and put it into the refrigerator. What a treat, fresh pineapple, I use to cut it way to early and it never really ripened after cutting. This trick works great and is easy to do.

Enjoy Tamara

0 Comments

5 Tips To Avoid Soggy Summer Fruit Pies

1/21/2015

0 Comments

 
Picture
I love pies but they can be tricky, especially with fresh fruit. Getting the filling to be just right not to thick or worse yet to runny is a problem. Here are some tips that will help you in your pie baking attempts this summer, I hope you try them.

1. Blind Bake The Crust
Blind baking is really just another way of saying "pre-baking." It simply means that you bake the pie crust on its own before adding the filling. This is something you do if the filling itself isn't going to be cooked (like a fruit tart) or if the filling will cook faster than the crust (like with a quiche). You can also either fully bake the crust or partially-bake it so that it has a head start when the full pie goes in the oven. The recipe should specify how far to cook the crust.

There are two ways to go about blind baking:
A. Docking involves pricking the crust with a fork to allow steam to escape evenly. Otherwise the crust will tend to bubble up and cook unevenly.

B. Pie weights do the essentially same thing by pressing down the crust and holding it in place. You can buy fancy ceramic pie weights or simply use dried beans. Either way, put a layer of parchment between the crust and the pie weights to keep the pie from picking up any off flavors from the weights, and push the weights all the way to the edges to help keep the sides from collapsing during baking.

For either method, bake the pie crust in a 425° oven until the edges are brown and golden. Allow 20-30 minutes for full baking or 10-15 minutes for partial baking. If you're using pie weights or beans, remove them halfway through cooking so the steam can escape and the bottom can fully cook.

2. Thickening The Fruit Filling
Cornstarch vs. quick-cooking tapioca or flour:
A. Cornstarch has a nice smooth texture and no real flavor, but it can lead to an occasional murky color with berry pies and its thickening power is compromised with high acidity fruit like cherries.

B.
Quick-cooking tapioca
will never result in a cloudy filling and soaks up really juicy fruit better than anything. However, it's a little difficult in the sense that it really needs high heat to activate completely. Make sure to give your pies a good ten minute dose of heat at 400 F if you're using this thickener.

C. Flour is an easy thickener in that you generally always have it on hand and it works beautifully. It can lead to a gummy, cloudy filling with delicate summer berries though. Reserve using flour as a thickener for heartier fruits like apples and pears.

3. Pay Attention To Bake Times
One reason you'll often end up with a runny fruit pie is simply that it hasn't been baked long enough. Any thickener you use needs a little time to set up, and people often see their crust turning light brown and think the pie is done when it's really not. I always cover the fluted edge of  my pie crust with a strip of aluminum foil to keep it from getting to brown, especially since it's whole grain it tends to be darker in color to start with.

4. Prepare Your Fruit
Let your fruit sit in sugar for a half an hour and drain the natural juices that will gather. This is especially good to do with peaches or strawberries. I also cook my fruit especially apples, or pears since they shrink down so much. I place them in a skillet and cook with no moisture they will give off moisture until they have become tender. I add all my spices and sugar if needed. Then I add the precooked fruit to the partially blind baked crust.

5. Soak Up The Juice
Try sprinkling graham cracker crumbs inside your bottom crust; they soak up some of the juices released from fruit during baking. I have also used ground cookie crumbs on the bottom of the crust before adding the fruit.

A couple of other baking  tips are place your pie pan on a cookie sheet and in the lower 1/3 of the oven. I also always cover the edge of the crust up front with a long piece of aluminum foil so it does not get to brown. Fresh fruit pies are summers great gifts, so get into the kitchen and surprise your family with a pie.

0 Comments

Cake Pan Conversions

1/21/2015

0 Comments

 
During the holidays we sometimes need to accommodate recipes for larger groups. It's always a challenge to figure out if I double the recipe what pan should I use.

Below is a chart that gives you the size of the pan along with the volume of the pan. If you have an unusual pan size and would like to figure out it's capacity, measure the amount of water it takes to fill the pan. Compare that measurement to the volumes in the chart below to determine how much batter you'll need.

The baking time may change using a different pan so it's important to keep an eye on your cake, and check for doneness. 
You never need to adjust the oven temperature you only need to adjust the baking time. For example, the same cake batter baked in a Bundt cake pan might take a full hour to bake, whereas cupcakes
might be done after only 20 minutes. You will still bake them both at the same oven temperature.


The cake should spring back when you touch the surface lightly with your finger if it's done. If it springs back, use a toothpick to be sure it's done. Insert a toothpick in the center of the cake and hold it there for a second before pulling it out. If a couple of crumbs stick to the toothpick, the cake is done; if you see a wet batter, add about five more minutes to your timer before checking your cake again.


Chart from allrecipes.com
Recipe Calls For
1 (8") round cake pan


2 (8") round cake pans


1 (9") round cake pan


2 (9") round cake pans


1 (10") round cake pan


2 (10") round cake pans


1 (9") tube pan


1 (10") tube pan


1 (10") bundt pan


1 (11" x 7" x 2") pan


1 (9" x 13" x 2") pan


1 (10" x 15" x 1") 
jelly roll pan


1 (9" x 5") loaf pan


1 (8" x 4") loaf pan


1 (9") springform pan


1 (10") springform pan


 1 (8") square dish


1 (9") square dish

Volume
4 cups


8 cups


6 cups


12 cups


11 cups


22 cups


12 cups


16 cups


12 cups


6 cups


15 cups


15 cups


8 cups


6 cups


10 cups


12 cups


8 cups


8 cups
Use Instead
1 (8x4) - inch loaf pan
1 (9") round cake pan
1 (9") pie plate

2 (8x4) - inch loaf pans
1 (9") tube pan
2 (9") round cake pans
1 (10") Bundt pan
1 (11 x 7") baking dish
1 (10") springform pan

1 (8") round cake pan
1 (8 x 4") loaf pan
1 (11 x 7") baking dish

2 (8 x 4") loaf pans
1 (9") tube pan
2 (8") round cake pans
1 (10") Bundt pan
2 (11 x 7") baking dishes
1 (10") springform pan

2 (8") round cake pans
1 (9") tube pan
1 (10") springform pan

5 (8") round cake pans
3 or 4 (9") round cake pans
2 (10") springform pans

2 (9") round cake pans
2 (8") round cake pans
1 (10") Bundt pan

3 (9") round cake pans
2 (10") pie plates
2 (9") deep dish pie plates
4 (8") pie plates
2 (9x5") loaf pans
2 (8") square baking dishes
2 (9") square baking dishes

1 (9x13") baking dish
2 (9") round cake pans
2 (8") round cake pans
1 (9") tube pan
2 (11x7") baking dishes
1 (10") springform pan

1 (8") square baking dish
1 (9") square baking dish
1 (9") round cake pan


1 (10") bundt cake pan
2 (9") round cake pans
3 (8") round cake pans
1 (10" x 15") jellyroll pan

1 (10") bundt pan
2 (9") round cake pans
2 (8") round cake pans
1 (9" x 13") baking dish

1 (9 x 2) deep dish pie plate
1 (10") pie plate
1 (8") square baking dish
1 (9") square baking dish

1 (8") round cake pan
1 (11" x 7") baking dish

1 (10") round cake pan
1 (10") springform pan
2 (8") round cake pans
2 (9") round cake pans


2 (8" x 4") loaf pans
1 (9") tube pan
2 (9") round cake pans
1 (10") bundt pan
2 (11" x 7") baking dishes
2 (8") round cake pans

1 (9 x 2) deep dish pie plate
1 (9" x 5") loaf pan
2 (8") pie plates


1 (11" x 7") baking dish
1 (9 x 2) deep dish pie plate
1 (9" x 5") loaf pan
2 (8") pie plates
0 Comments

    Baking Education

    Cooking Tips & Shortcuts

    Archives

    October 2020
    February 2019
    August 2018
    June 2018
    March 2018
    March 2017
    November 2016
    September 2016
    July 2016
    May 2016
    April 2016
    March 2016
    February 2016
    January 2016
    December 2015
    November 2015
    October 2015
    September 2015
    August 2015
    July 2015
    June 2015
    May 2015
    April 2015
    March 2015
    January 2015

    Categories

    All
    Baking Tips
    Candy
    Converting Recipes
    Equipment
    Food Coloring
    Gifts
    Gluten Free Tips
    Herbs & Spices
    Ice Cream Tips
    Leavening Agents
    Meats & Eggs
    Oils
    Pie Tips
    Pie Tips
    Preserving Food
    Thickening Agents
    Tips On Produce

    RSS Feed

Powered by Create your own unique website with customizable templates.