Whole Grain 100
Email: Tamara@wholegrain100.com
  • Welcome
  • Co-Op
  • Store & Classes
  • Baking Education
  • Recipes
  • Grain Education
  • Health & Nutrition
  • Medicinal Seeds

Oat Bran Broom Bread

7/25/2020

0 Comments

 
This recipe is from Peter Reinhart's book and is simple to make. It makes one large loaf and is best to use finely ground whole grain flour. His method is a bit different than most when baking but it's the method that I have had the most success with in obtaining light high loaves.
Soaker
184g hard red or hard white flour (1 1/3c + 1T.)
28g  oat bran (4T.)
14g flax seeds (1 1/2 T.)
4g salt (1/2 tsp.)
198g water (3/4 c. + 2T.)
  • Mix all the soaker ingredients together in a bowl until all of the flour is hydrated and the ingredients form a ball of dough.
  • Cover and place in the fridge, this is good for 3 days.
Biga
227g hard red or hard white flour (1 3/4c.)
1g instant yeast (1/4 tsp.)
170g water (3/45 c.)
  • Mix all of the biga ingredients together in a bowl and form a ball of dough. It will be tacky, let it rest a few minutes and knead a few times until smoother. Cover and place into the fridge. This is good for up to 3 days

Final Dough
The next day or the day of baking take the biga and soaker out of the fridge. I use them cold but you can let come to room temperature. You will be adding the final ingredients to them.
In a small container mix together:
56g hard red or hard white flour (7 T.)
5g salt (5/8 tsp.)
7g instant yeast (2 1/4 tsp)
42g honey, or agave nectar or brown sugar (2 1/2 T)

14g vegetable oil (1 T.)

  • Lay the biga on the counter and flatten into a disk, then lay the soaker on top and flatten into a disk.
  • Cut thru the disk,  into about 12 pieces and put into your mixing bowl. As you are cutting the dough add the final ingredient to the cut up pieces.
  • Finally add the vegetable oil to the mixing bowl.
  • Put the dough hook on and mix for 3 minutes at low speed. The dough will be soft and slightly sticky. If it seems too sticky let the dough rest 5 minutes and come back to see how it feels. If it needs more flour or water adjust as needed. Test to see if you have a windowpane.
  • Bulk proof for 45-60 minutes until it is about 1 1/2 times it original size.
  • Shape as a freestanding batard or place into a greased loaf pan. I use a 9 inch pullman pan.
  • Cover so the top stays moist and let it raise another 45-60 minutes.
  • Preheat the oven to 425 degrees, I use a steam pan in the bottom of the oven while preheating.
  • Place the loaf into the oven and lower the temperature to 350 degrees. Bake for 20 minutes then rotate the pan if needed and continue baking another 20 minutes.
  • To test for done, the loaf will reach an internal temperature of 195 degrees. It will be rich brown and have a hollow sound when thumped on the bottom.

0 Comments

Making Your Own Yeast

4/22/2020

0 Comments

 
Yeast is a hot commodity lately, it's no where to be found in the supermarkets. There is a way to make your own yeast using fresh or dried fruit and even potatoes will work. This does take a few days to get the yeast going. Watch The Video
Creating yeast water couldn’t be easier, simply combine fruit and water, and you’ll be ready to bake naturally leavened bread in about week. Yeast is all around us, all we have to do to harness it's power. When you create yeast water you are harvesting the yeast that naturally occurs in fruit and vegetable skins or pulp. Avoid using mango, pineapple, kiwi and papaya. these fruits contain a protease enzyme. This enzyme destroys protein and inhibits gluten development.
Supplies Needed:
  • 34oz jar glass is best but plastic will work
  • Funnel

Recipe: From PJ Hamel at King Arthur Flour
  • 500g (2 1/4 cups) of water (tap water is fine)
  • 50g (1/4 cup) of granulated sugar
  • 2 dried dates (pitted or whole)
Note: You can use other fruits like organic raisins about 1-2 T. Also different types of sugar would work, even molasses or honey.

Directions:
  • Add the fruit, water and sugar to the jar and screw the cap on the jar. Shake vigorously to dissolve the sugar. Loosen the cap a half-turn and put the bottle somewhere warm 78.8°F is optimal. I put the bottle on my freezer or the top of the hot water tank would work in my house.
  • Shake the bottle twice a day for 4 days. Unscrew the cap daily to let out any pressure buildup, screw it back on, then shake well.
  • By the end of 4 days, the water should be frothy on top, and you’ll definitely be able to smell the fruit fermenting.

Day 5: Add the following to the bottle:
  • 1 dried date
  • 5g (1 teaspoon) salt
  • 20g (1 1/2 tablespoons) granulated sugar
  • 400g (1 3/4 cups) water
Shake the bottle vigorously to dissolve the sugar. Put it back in its warm spot, and shake twice a day, uncapping and recapping each time, for 4 more days.

Baking
  • Each bottle of yeast water will yield about six average-sized loaves of bread, minus the 200g you need to save for future loaves.
  • Use the yeast water instead of the water or liquid in the bread.
  • It may take longer for your loaf to raise, that will depend on the amount of the yeast water used and the strength of the yeast in the water.

Save 200g yeast water plus add the following for future use
  • 700g tap water
  • 35g sugar
  • 3.5g salt
  • 2 dried dates
  • Shake twice a day for 2 to 3 days, until the yeast water is foaming nicely. Strain out the dates, and store water in the refrigerator.
  • Yeast water makes a bread with mild, rather than an assertive sourdough tang. This can be a pro or con, depending on your personal taste.

Pros
  • There’s very little upkeep; once yeast water is made it can live in the refrigerator for up to a couple of months without being fed.
  • Yeast water isn’t fed with flour and there’s no discard; so you’re not throwing away flour, as you might with a standard starter.
Cons
  • Since there’s no discard with yeast water, you don’t have the chance to make a lot of yummy recipes that call for sourdough starter discard.
  • Making a starter with yeast water takes longer: up to around 16 hours, as opposed to around 6 to 8 hours for a standard sourdough starter.

0 Comments

Dark Rye Bread

2/22/2020

0 Comments

 
Picture
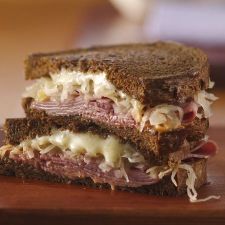
This is a recipe from The Laurel's Kitchen Bread Book. All of her recipes are made with 100% whole grain flours. This bread is a good all-around loaf for sandwiches and just perfect for a Reuben sandwich. Below is the exact recipe from Laurel's Kitchen, but I have had better luck with this recipe using a couple of different mixing techniques. Read both methods and decide what will work best for you, they are the same ingredients just put together differently.

Yields: 2 loaves
Bake: 50 minutes
Oven: 350 degrees

Ingredients:
2 tsp. active dry yeast (7g)
1 c. warm water (235g)

3 c. rye flour (385g)
4 c. hard red wheat flour (600g)
2 T. carob powder (18g)
2 1/2 tsp. salt (14g)
1/2 tsp. caraway seeds

1 c. tepid water (235g)
1 1/2 T. honey (30g)
2 T. cider vinegar (30g)
2 T. vegetable oil (30g)

1 c. more water if needed to knead (235g)*
Directions:
  1. Dissolve the yeast in the warm water, put to the side
  2. Mix the flours, carob, salt, and seeds in your mixer bowl.
  3. In a small bowl mix all of the liquid ingredients together, except for the last cup of water*
  4. Add the yeast mixture and the vinegar mixture to the flour in the mixing bowl gradually. Mix until all the the flour is wet, it will be stiff. Let the dough sit for 5 minutes to fully absorb the liquid.
  5. Put your dough hook on your mixer and knead, if the dough is very stiff, add 2T - 1/4 cup for of water you have held back on. Knead until the water is absorbed, stop kneading and wait 3-5 minutes. Knead again if the dough is still stiff repeat this until the dough becomes soft.
  6. Rye is a difficult dough to work with, it can become sticky all of the sudden, so add the water slowly.
  7. It may be easier to handle with wet hands so dip your hands in cool water and shake off the excess. Form the dough into a ball and put it smooth side up in a bowl.
  8. Let it rise in a draft-free place until a 1/2 inch hole from your wet finger does not fill in.
  9. Press flat, form again in to a smooth round, and let it raise again as before. The second rising will take about half as long as the first.
  10. Deflate the dough and form into two 8"x4" pan loaves or three hearth  loaves.
  11. Let them rise in a warm place until the dough slowly returns a gentle indentation made with your wet finger.
  12. Put the loaves into a preheated 350 degrees F. oven for about 50 minutes.
  13. You do not need to slash the loaves.
  14. Once baked remove from pans and cool completely.
Same Recipe but different mixing techniques:
The reason I have adopted a few different techniques is wheat and rye do not absorb liquid at the same rate. Rye has more fiber and is slower to absorb liquid. Also, they both have gluten but wheat gluten is stronger and is what will lift this bread. I develop the wheat gluten first before adding the rye flour to the mix. Rye also breaks down when over kneaded, which is very easy to do. To overcome all these issues, I take the liquid in the recipe and add some to the wheat flour and develop the gluten until I get a window pane. Then add the rest of the liquid to the rye flour mix and add this to the developed wheat dough. I mix them until just combined, that way the rye is not over mixed.

Recipe:
3 c. rye flour (385g)
2 T. carob powder (18g)
1/2 tsp. caraway seeds
2 T. cider vinegar (30g)
275g water

4 c. hard red wheat flour (600g)
2 tsp. instant yeast (7g)
2 1/2 tsp. salt (14g)
2 T. vegetable oil (30g)
2 T. honey (30g)
425g water

Directions:
  1. The Rye flour, carob, caraway seeds, vinegar, and water add to the mixer. Mix with the paddle attachment until is mixed. Take out of the mixer and put on the counter
  2. Add the wheat flour, yeast, salt, oil, honey and water to the mixer and mix with the paddle until mixed. Let it sit for 5 minutes.
  3. Put the dough hook on and knead the wheat flour for 5-10 minutes until the gluten is developed. The dough will be elastic, remove from the bowl and place dough on the counter
  4. Make a disk out of the wheat dough and the rye dough. Lay one on top of the other and cut into hunks and return to the mixer.
  5. Knead until completely mixed, do not over knead. The dough will be sticky, if you need too, remove and finish the kneading by hand.
  6. Continue with the directions from step 7 bulk proof.
Hints:
  • Making rye can be a challenge but well worth it, the dough will be sticky that is fine, just keep your hands moist.
  • You do not need to slash these loaves.
0 Comments

Types of Pre-Fermentations

7/16/2019

0 Comments

 
There are many ways to classify doughs. Breads made in one mixing cycle with no pre-fermets are classified as direct or straight doughs. Breads made with a pre-ferment are know as indirect or sponge breads. Working with whole grain pre-ferments are used to improve flavor, develop gluten, provide structure to the dough and stay fresh longer.

Bread gets its spongy consistency from fermentation—the interplay of flour, water, and yeast that begins when the water activates an enzyme contained in the flour that breaks down the starch and converts it to sugar. The yeast feeds on the sugar, growing and multiplying, and producing 2 essential by-products: alcohol and carbon dioxide. The alcohol adds flavor, while the bubbles of carbon dioxide "leaven," or raise, the dough and establish the bread's crumb or texture.

Pre-fermentation involves mixing part of the dough's flour, water, and yeast and allowing it to ferment before adding it to the rest of the dough. The use of a pre-ferment allows you to use less yeast because the pre-ferment kick-starts the fermentation process before the dough is actually mixed together.

Making a pre-ferment several hours before adding it to dough will give bread an extra depth of flavor, but if a pre-ferment is made one or even several days in advance, it will also add acidity. In small amounts, acidity extends the shelf life of bread, but in larger amounts, such as in the case of sourdough, it starts to affect the texture of bread, creating large holes in the crumb.

There are many types of pre-ferments but basically 2 categories wet or firm. Most Americans are use to a wet pre-ferment like a sour dough sponge. Europeans use more firm pre-ferments since they are easier to adapt in recipes. The pre-ferment is the same hydration (amount of liquid to flour ratio) as the final dough, which means it feels like the final dough when kneading.

Wet Pre-ferments (50% or more liquid to flour ratio)
  1. Poolish- a wet sponge, is easy to make and is best when made fresh each time you need it. It will, however, also be good for up to 3 days if stored in the refrigerator and can be frozen if you choose to do so. The flour and the water are the same weight and are mixed with a spoon.
  2. Levain- This is a French term used for a sour dough starter or a wild yeast starter. It mainly is a wet pre-ferment.
  3. Sourdough - The most common pre-ferment to home bakers in the U.S, it's usually wet. 

Firm Pre-ferment (less then 50% liquid to flour ratio)
  1. Biga- Is the Italian verson of a firm pre-ferment. A Biga has the same feeling as the finished    dough it includes a small amount of yeast and no salt. The biga is retarded overnight in the refrigerator or can be held for up to 3 days before it must be used.
  2. Pate Fermentee- The French version of a firm pre-ferment. The Pate Fermentee can be made in advance but more often it's a piece of dough from the bread baked the day before. The difference between a Biga and a Pate Fermentee is the addition of salt in the Pate Fermentee.
  3. Desem- An ancient style of sourdough developed by the Flemish a region of Belgium. Desem takes weeks to develop in a cool temperature. The flavor is more complex and less sour than a sour dough starter.


0 Comments

New Heights With 100% Whole Grain

7/16/2019

0 Comments

 
Fats and Oils are added to breads to improve flavor and provide a moist texture and rich taste. Butter, margarine, shortening, nut and vegetable oils add flavor and make the bread tender and moist. They also slow moisture loss, helping bread to stay fresh longer.

Liquid fat, like oils and melted butter that are incorporated into the bread dough before kneading will inhibit the gluten formation.  Gluten is the (protein) elastic bands that allow the bread to raise. If your recipe calls for you to add melted  butter or oil to the dough, knead the dough first to develop the gluten.  In fact, recipes that require no fat will raise higher than recipes that add fat before the gluten is developed.

You can have the best of both worlds, all the benefits of the added fat and a high loaf. How and when the fat is added to the dough is the secret. You can use this trick with any recipe, just add the fat at a different time in the mixing process.

It's hard to get a light loaf using 100% whole grain but using a method developed by the French to add the butter after the gluten has been developed really helps when making 100% whole grain breads.

What I do is develop the gluten with the mixer or by hand and the last couple of minutes of kneading, I add cold butter which has been cut up into small pieces to the dough. I poke holes with my fingers in the dough and insert a piece of cold butter into each. Then I put the dough hook back on the mixer and knead or continue kneading by hand.  At first the dough will start to fall apart but as you incorporate the cold butter the dough will pull together and the finished result is amazing.

Think of the cold butter like putting cream rinse on your long hair (gluten strands). The butter de-tangles the developed gluten strands which allows them to stretch to the fullest extent, and the bread to raise to new heights.

Next time your struggling with a recipe that for some reason never seems to raise very well try this technique. With bread making the ingredients are simple but sometimes the techniques make the difference between a brick and a high light loaf.

Happy Baking
Tamara

0 Comments

How To Make A Proofing Box

7/11/2019

0 Comments

 
I think one of the hardest things to achieve is a good place to proof your dough. Everyone's home is different in temperature and humidity so what might work for some is not the best option for others. There are so many options to proofing your dough, some folks even proof overnight in the fridge.

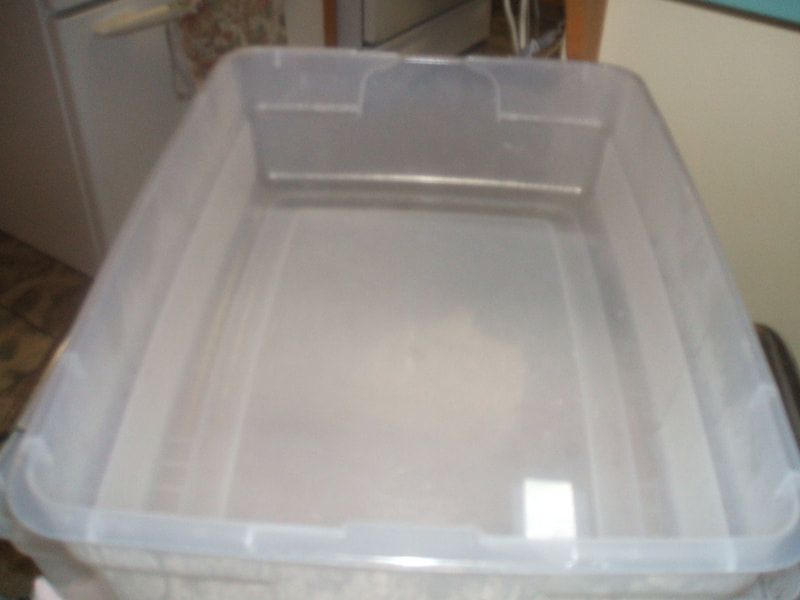
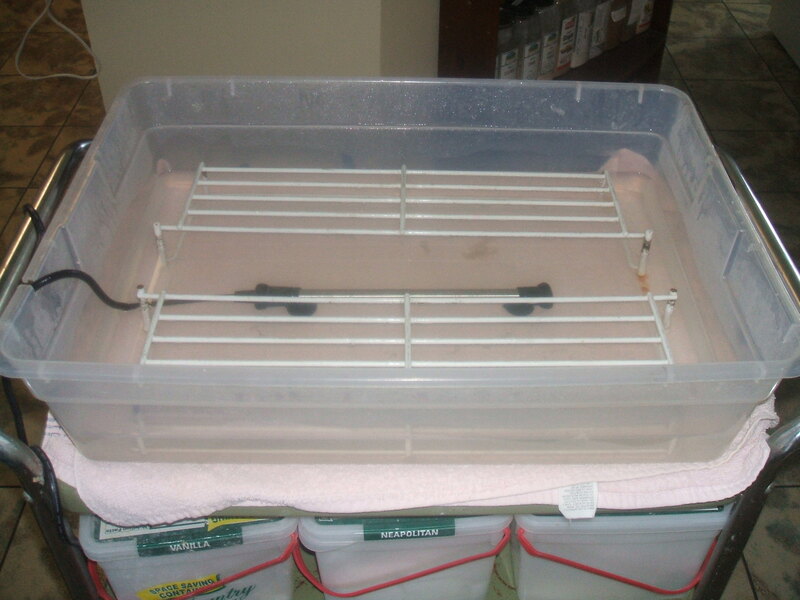
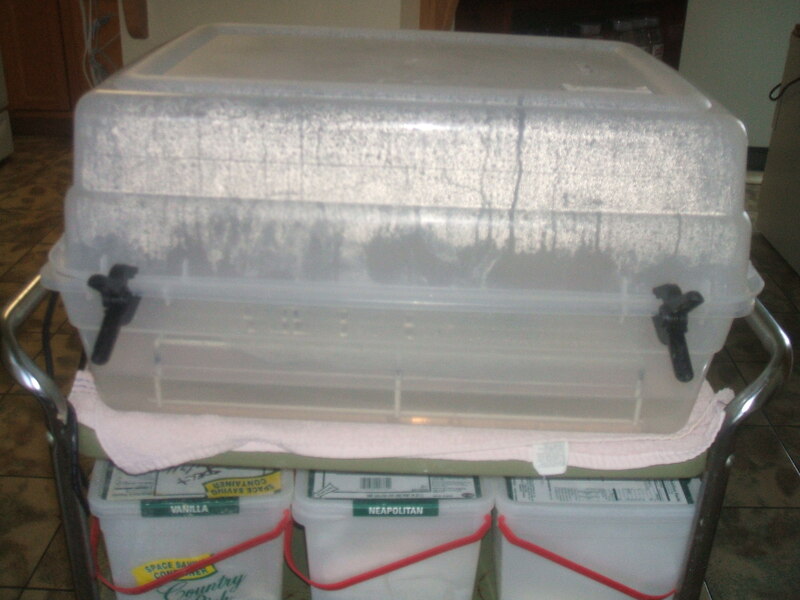
I ferment the dough in the fridge overnight but then I get it out and put the bread together in the morning. After kneading the dough I bulk proof it in my proofing box. I have tried many different proofing boxes and this one is simple to make, very inexpensive, easy to clean, and stores away until needed. In my kitchen space limitations are an issue, I keep the proofing box on a rolling cart that must fit under a shelf. So the height of the plastic tub in my circumstances was an issue. I used two plastic tubes about 6 inches in height. There was nothing available in the correct height and width that would work for my situation. 

Supplies Needed
  • 2 plastic tubs minimum of  6 inches in heights the length and width is up to you - clear plastic is best so you can see into it.
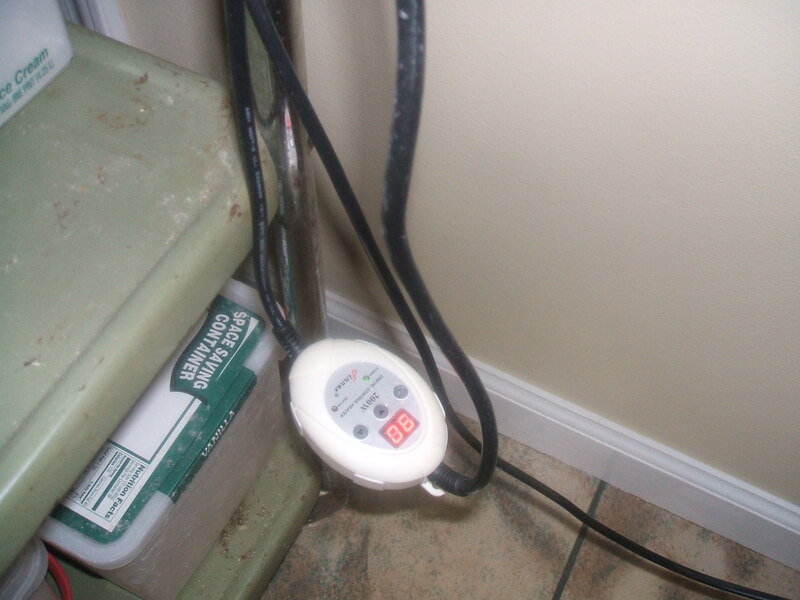
  • Fish Aquarium heater - they are under $20.00 (check temperature range on the model)
  • Clips to hold the tubs together
  • Some sort of rack to fit inside that water will not damage and hold your bowl or pans above the warm water.
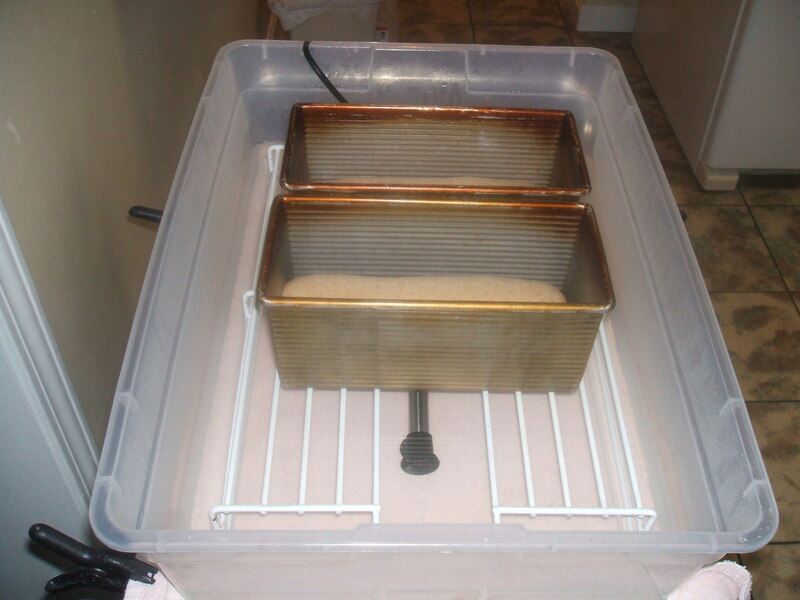
I have my proofing box on a rolling cart, which makes it easier to move around. Once filled with water it can be a bit on the heavy side. When not in use my proofing box is rolled under a shelf out of the way.

According to the directions you must fill the water about 1 inch in depth above the  fish aquarium heater. The heater will hold the water at a constant temperature of 90 degrees just about perfect for bread.

The rack is just something I found at the thrift shop and chopped it in half to fit inside the tub. Once loaded with the loaves, I put the other tub on top and clip them together. Since they are clear you can see how the bread is coming along.

Cleaning is a breeze, just drain the water and wipe down the tubs and store away. I hope this information will help you to come up with a workable solution to getting your bread to raise to new heights.
0 Comments

Developing A Windowpane

7/11/2019

0 Comments

 
 No matter what type of flour you use or style of bread you bake you need to develop the gluten enough to achieve a "windowpane". This is the most reliable method to determine when the gluten in the dough has been developed enough to give you a nice light high loaf.

To determine if your dough is ready cut off a small piece of the dough and gently stretch and pull on the piece turning it as you are pulling. The idea is you want to see if you can pull the dough enough to form a thin translucent membrane, like a windowpane. If the dough rips right away the gluten is not developed enough and you will continue to knead the dough and try the test again.

Because of all the fiber (bran) in the dough it is more difficult to achieve the windowpane. That is why I believe an indirect method for making bread with whole grains is so much easier. The fact you let it ferment overnight allows the bran to soften and will reduce it from cutting the gluten strands when trying the achieve your windowpane.

If you are kneading your dough by hand there is little chance you will over knead it, your arms will give out first. I use a 7 quart mixer which is larger than most have at home so it does not take that long to achieve a good windowpane about 5 minutes. If your mixer is smaller it may take a few minutes longer. Put your timer on, after remove the dough and check it with your hands is it stretchy, you will get the feel of it with practice. The pictures below give you a good idea of how thin you need to stretch the dough to see light thru it.
0 Comments

Pretzel Buns

7/19/2015

0 Comments

 
PicturePicture from King Arthur Bakery
Pretzel Buns are all the rage now in the bakeries and high end restaurants. How to achieve the dark crunchy crust is not hard and something you can do with your favorite roll or bun recipe. By simply adding a final step to your bread making process your buns will look like a million bucks.

13 Stages of Bread Making
Mix your dough and bulk proof until double in bulk. Punch it down, round the dough and divide your dough into the sizes you want for your buns. Place your buns on your pan, keep them covered and let them raise. While they are raising you will prepare the water bath.

Water bath Recipe
2 quarts water
1 tablespoon salt
1/4 cup baking soda

The water bath gives your buns a dark brown color and a wonderful pretzel flavor. You do not need a large deep pan, a 10" electric frying pan works very well.

Bring the water, salt, and baking soda to a boil. When your buns have risen, drop several of them into the boiling water bath. Cook for about 30 seconds then flip them over for another 30 seconds. Scoop them out with a slotted spoon and put them back onto the baking sheet. repeat this procedure with all of the buns.

For that signature pretzel bun look, use scissors or a sharp knife to cut 1/2″-deep crosses into the center of each bun. This step is optional; but will give your buns a pattern when they bake.

Sprinkle each bun with the topping of your choice. If you use sea salt as the topping reduce the amount of salt in the recipe. You could use any seeds, onions anything that will give them a nice look.

The additional water bath causes the buns to brown quicker then usual so I suggest that you put then on a lower rack in the oven to bake. Bake as usual but keep your eye on them. If they are getting a bit to brown cover them with foil for the remaining baking time.

Hint:
Bake smaller buns for a shorter amount of time; larger buns, longer. If you have a digital thermometer, the temperature of a perfectly baked bun will be 190°F at its center.

If you’re baking two pans of buns, and they both won’t fit on a lower rack, it’s OK to bake one while the other sits. The water bath has stopped a lot of the yeast action, so the waiting buns won’t let them over-rise.

Salt-topped buns are best consumed the day they’re made.The salt on top of the buns will dissolve into the bun. This will result in a puckered appearance of your buns. Buns topped with seeds rather than salt hold up better, though they still suffer a little bit of puckering due to the salt in the water bath.

Sources
King Arthur Flour


0 Comments

Additions To Bread

1/12/2015

0 Comments

 
If  you have a few recipes that work for you and would like to use them  more often but change them for a different look and taste knowing something about herbs is helpful. The basic whole grain bread I teach in my class is just that recipe, it's easy to make and always turns out great. With the addition of a few items it can be a whole different recipe.

When adding additions to bread there are two considerations:
1) Will the additions alter the liquid in the recipe, what I mean by that, is the addition something that is moist,  like sweet potatoes or onions.  You may have to reduce the liquid in the recipe to accommodate the extra moisture.  If it's something that sucks up the moisture, for example oats or bran you may have to add more liquid to the recipe.

2) Will the addition be difficult to eat, (hard or tough) you may need to soften it. This for example would be seeds or nuts. My rule is if it's hard to chew, then cook it before adding it to the bread. Then there may be the issue of additional moisture added to the recipe that you may have to deal with.

Usually I want to keep it simple and not guess at the liquid variable or precook anything at the last minute. So adding dry, or fresh herbs is one way to achieve a different taste without all the hassle.

Add your additions to the recipe on day 2 when mixing the Biga and Soaker together with the final ingredients.

Rosemary Herb Combination per loaf
2 tsp.  finely chopped (dried) rosemary or 2 T. fresh
1 tsp. chopped (dried) oregano or 1 T. fresh
1 tsp. chopped (dried) Basil or 1 T. fresh

This is a very nice combination that I use in rolls, but makes good hamburger buns also. When I make hamburgers with grilled onions and cheese these rosemary buns are just the perfect combination.

Olive Bread  per loaf
1/2 c. Kalamata olives drained well, pitted and chopped
1 tsp. finely chopped (dried) rosemary or 2 T. fresh
1/2 tsp. sesame seeds

Lots of flavor, but if you don't drain the olives well, you may have to add a couple of extra tablespoons of flour in your final recipe.

Carrot Herb Bread per loaf
Recipe is for dried herbs, if you use fresh use twice the amount
50g carrot grated (about 1 med. carrot)
1/4 tsp. garlic powder
1/2 tsp. sage
1 tsp. dill weed
1 tsp. dill seed
2 tsp. basil
2 tsp thyme
1 tsp cumin seeds

Note: This makes nice rolls and a pretty loaf, and is my favorite for grilled cheese sandwiches.

Sweet Spice Mix (2 tsp of the mix per loaf)
2 tsp. cinnamon
1 tsp. coriander
1/2 tsp. allspice
1/4 tsp. ginger
1/4 nutmeg
1/8 tsp. cloves

Use no more than 2 tsp. of the mix for a loaf of bread. The cinnamon will effect the yeast growth. This is  great in any sweet bread, quick bread or pancakes. Even 1 tsp. added to your coffee grounds when you perk coffee in the morning and will give it a special flavor. This is perfect in scones, cinnamon toast,  or sweet rolls I always make extra because it's so good in any sweet bread recipe

Experiment with your own combinations and create something special.
Tamara
0 Comments

Change The Hydration Of Your Dough

1/12/2015

0 Comments

 
Picture
We will be addressing the issue of hydration of different dough's. This subject is extremely important if you are to ever achieve the perfect loaf, pizza crust or any yeast bread. Warning there is math involved but, if I can do it, anyone can do it. Let me tell you it beats adjusting the recipe by guessing how much water to add, I know from experience.  

Bakers Percentage
Most home bakers use a recipe to make bread which is made up of cups, tablespoons and other measurements. Most serious baker use a formula all of the ingredients are in one  type of measurement like grams. There is a difference between a recipe and a formula; a recipe  can be doubled without affecting the end product. You can not take a recipe for a loaf of bread and expand it to make 50 loafs the proportions will not work, but with a formula you can.

Before we go into the formula, lets talk a little about the important basic guidelines for using the baker's percentage.

Guidelines:
1. All ingredients are measured by weight, including liquids; they should  be measured using a consistent unit of measure, for example grams. You do need a scale, once you have one you will wonder why you didn't buy one sooner. The time savings alone is worth the cost of the scale which is about $20.00.

2. The main ingredient in the recipe (formula) is flour....it's always considered 100%. When two or more types of flours are used in the formula, their combined total is considered 100%.

3. The weights of all other ingredients are expressed as a percentage of the total flour weight.

Real life you are making your favorite loaf of bread and it always seems to be so sticky, and you have a problem with it falling when baked. Could it be the recipe? Is there to much water in the recipe? How can I tell?

Bread Recipe (example only)
Flour 511 g  (if using 2 types of flour add together for total flour)
salt 4 g
yeast 6 g
milk + water = 400 g  (if using 2 types of liquid add together for total liquid like this example)
honey 42 g  (even though this is liquid it's not enough to be added to the liquid total)
butter 28 g
   (melted butter is not enough to be added to the liquid total)

The only numbers we are concerned about are the flour (511 g) and the liquid (400 g) to find the hydration of the recipe. 

Formula   = Liquid  will give you the ratio of fluid to flour in the recipe
                    Flour
 
Recipe         Liquid 400 g  = .78    .78 x 100% = 78% hydration

                    Flour 511 g

So what does this mean that my bread has 78% hydration?
Every type of bread is best at a certain percentage; this recipe is at 78%, which is too wet if you are making loaf bread.
Loaf Bread should be 68 - 72% hydration
Artisan Bread has 75 -80% hydration, much more liquid, this causes the open holes in the finished bread.

The recipe needs adjusting but how much liquid do I decrease in the recipe to get to 72% hydration? Instead of guessing lets use math and get it correct the first time.

What do you know?
You want the bread to be 75% hydration ...we know that
You know the amount of flour in the recipe is 511 g
What you want to figure out is how much water do I need to add to the recipe?


75% (correct hydration)    75 g  or expressed as .75
                                        100 g


511 g flour x .75 =383.25 g water (is desired total water for recipe)

Therefore; in above recipe:
Replace milk + water = 400 g    to: milk +
water = 383 g

You can reduce the water only, milk only or a combination, as long as the total amount of liquid is no more than 383 g. This should correct your problem when making your bread. Go ahead and give it a try, adjust again if needed using the same formula.                                 


0 Comments
<<Previous

    Yeast Bread
    Education


    Archives

    July 2020
    April 2020
    March 2020
    February 2020
    July 2019
    March 2019
    August 2018
    June 2018
    January 2017
    April 2016
    October 2015
    July 2015
    February 2015
    January 2015

    Categories

    All
    English Muffins
    Flat Breads
    Hamburger Buns
    Making Yeast Bread
    Rolls
    Understanding Ingredients
    Yeast

    RSS Feed

Powered by Create your own unique website with customizable templates.