Whole Grain 100
Email: [email protected]
  • Welcome
  • Price Sheet
  • Store & Classes
  • Baking Education
  • Recipes
  • Grain Education
  • Health & Nutrition

Developing A Windowpane

7/11/2019

1 Comment

 
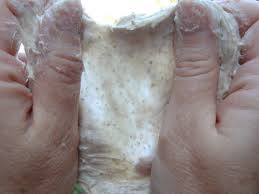
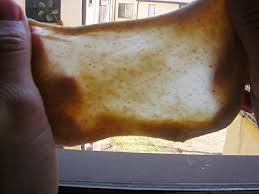
 No matter what type of flour you use or style of bread you bake you need to develop the gluten enough to achieve a "windowpane". This is the most reliable method to determine when the gluten in the dough has been developed enough to give you a nice light high loaf.

To determine if your dough is ready cut off a small piece of the dough and gently stretch and pull on the piece turning it as you are pulling. The idea is you want to see if you can pull the dough enough to form a thin translucent membrane, like a windowpane. If the dough rips right away the gluten is not developed enough and you will continue to knead the dough and try the test again.

Because of all the fiber (bran) in the dough it is more difficult to achieve the windowpane. That is why I believe an indirect method for making bread with whole grains is so much easier. The fact you let it ferment overnight allows the bran to soften and will reduce it from cutting the gluten strands when trying the achieve your windowpane.

If you are kneading your dough by hand there is little chance you will over knead it, your arms will give out first. I use a 7 quart mixer which is larger than most have at home so it does not take that long to achieve a good windowpane about 5 minutes. If your mixer is smaller it may take a few minutes longer. Put your timer on, after remove the dough and check it with your hands is it stretchy, you will get the feel of it with practice. The pictures below give you a good idea of how thin you need to stretch the dough to see light thru it.
1 Comment

Pretzel Buns

7/19/2015

0 Comments

 
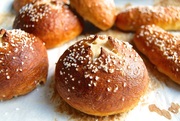
PicturePicture from King Arthur Bakery
Pretzel Buns are all the rage now in the bakeries and high end restaurants. How to achieve the dark crunchy crust is not hard and something you can do with your favorite roll or bun recipe. By simply adding a final step to your bread making process your buns will look like a million bucks.

13 Stages of Bread Making
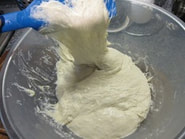
Mix your dough and bulk proof until double in bulk. Punch it down, round the dough and divide your dough into the sizes you want for your buns. Place your buns on your pan, keep them covered and let them raise. While they are raising you will prepare the water bath.

Water bath Recipe
2 quarts water
1 tablespoon salt
1/4 cup baking soda

The water bath gives your buns a dark brown color and a wonderful pretzel flavor. You do not need a large deep pan, a 10" electric frying pan works very well.

Bring the water, salt, and baking soda to a boil. When your buns have risen, drop several of them into the boiling water bath. Cook for about 30 seconds then flip them over for another 30 seconds. Scoop them out with a slotted spoon and put them back onto the baking sheet. repeat this procedure with all of the buns.

For that signature pretzel bun look, use scissors or a sharp knife to cut 1/2″-deep crosses into the center of each bun. This step is optional; but will give your buns a pattern when they bake.

Sprinkle each bun with the topping of your choice. If you use sea salt as the topping reduce the amount of salt in the recipe. You could use any seeds, onions anything that will give them a nice look.

The additional water bath causes the buns to brown quicker then usual so I suggest that you put then on a lower rack in the oven to bake. Bake as usual but keep your eye on them. If they are getting a bit to brown cover them with foil for the remaining baking time.

Hint:
Bake smaller buns for a shorter amount of time; larger buns, longer. If you have a digital thermometer, the temperature of a perfectly baked bun will be 190°F at its center.

If you’re baking two pans of buns, and they both won’t fit on a lower rack, it’s OK to bake one while the other sits. The water bath has stopped a lot of the yeast action, so the waiting buns won’t let them over-rise.

Salt-topped buns are best consumed the day they’re made.The salt on top of the buns will dissolve into the bun. This will result in a puckered appearance of your buns. Buns topped with seeds rather than salt hold up better, though they still suffer a little bit of puckering due to the salt in the water bath.

Sources
King Arthur Flour


0 Comments

Additions To Bread

1/12/2015

2 Comments

 
If  you have a few recipes that work for you and would like to use them  more often but change them for a different look and taste knowing something about herbs is helpful. The basic whole grain bread I teach in my class is just that recipe, it's easy to make and always turns out great. With the addition of a few items it can be a whole different recipe.

When adding additions to bread there are two considerations:
1) Will the additions alter the liquid in the recipe, what I mean by that, is the addition something that is moist,  like sweet potatoes or onions.  You may have to reduce the liquid in the recipe to accommodate the extra moisture.  If it's something that sucks up the moisture, for example oats or bran you may have to add more liquid to the recipe.

2) Will the addition be difficult to eat, (hard or tough) you may need to soften it. This for example would be seeds or nuts. My rule is if it's hard to chew, then cook it before adding it to the bread. Then there may be the issue of additional moisture added to the recipe that you may have to deal with.

Usually I want to keep it simple and not guess at the liquid variable or precook anything at the last minute. So adding dry, or fresh herbs is one way to achieve a different taste without all the hassle.

Add your additions to the recipe on day 2 when mixing the Biga and Soaker together with the final ingredients.

Rosemary Herb Combination per loaf
2 tsp.  finely chopped (dried) rosemary or 2 T. fresh
1 tsp. chopped (dried) oregano or 1 T. fresh
1 tsp. chopped (dried) Basil or 1 T. fresh

This is a very nice combination that I use in rolls, but makes good hamburger buns also. When I make hamburgers with grilled onions and cheese these rosemary buns are just the perfect combination.

Olive Bread  per loaf
1/2 c. Kalamata olives drained well, pitted and chopped
1 tsp. finely chopped (dried) rosemary or 2 T. fresh
1/2 tsp. sesame seeds

Lots of flavor, but if you don't drain the olives well, you may have to add a couple of extra tablespoons of flour in your final recipe.

Carrot Herb Bread per loaf
Recipe is for dried herbs, if you use fresh use twice the amount
50g carrot grated (about 1 med. carrot)
1/4 tsp. garlic powder
1/2 tsp. sage
1 tsp. dill weed
1 tsp. dill seed
2 tsp. basil
2 tsp thyme
1 tsp cumin seeds

Note: This makes nice rolls and a pretty loaf, and is my favorite for grilled cheese sandwiches.

Sweet Spice Mix (2 tsp of the mix per loaf)
2 tsp. cinnamon
1 tsp. coriander
1/2 tsp. allspice
1/4 tsp. ginger
1/4 nutmeg
1/8 tsp. cloves

Use no more than 2 tsp. of the mix for a loaf of bread. The cinnamon will effect the yeast growth. This is  great in any sweet bread, quick bread or pancakes. Even 1 tsp. added to your coffee grounds when you perk coffee in the morning and will give it a special flavor. This is perfect in scones, cinnamon toast,  or sweet rolls I always make extra because it's so good in any sweet bread recipe

Experiment with your own combinations and create something special.
Tamara
2 Comments

Change The Hydration Of Your Dough

1/12/2015

0 Comments

 
Picture
We will be addressing the issue of hydration of different dough's. This subject is extremely important if you are to ever achieve the perfect loaf, pizza crust or any yeast bread. Warning there is math involved but, if I can do it, anyone can do it. Let me tell you it beats adjusting the recipe by guessing how much water to add, I know from experience.  

Bakers Percentage
Most home bakers use a recipe to make bread which is made up of cups, tablespoons and other measurements. Most serious baker use a formula all of the ingredients are in one  type of measurement like grams. There is a difference between a recipe and a formula; a recipe  can be doubled without affecting the end product. You can not take a recipe for a loaf of bread and expand it to make 50 loafs the proportions will not work, but with a formula you can.

Before we go into the formula, lets talk a little about the important basic guidelines for using the baker's percentage.

Guidelines:
1. All ingredients are measured by weight, including liquids; they should  be measured using a consistent unit of measure, for example grams. You do need a scale, once you have one you will wonder why you didn't buy one sooner. The time savings alone is worth the cost of the scale which is about $20.00.

2. The main ingredient in the recipe (formula) is flour....it's always considered 100%. When two or more types of flours are used in the formula, their combined total is considered 100%.

3. The weights of all other ingredients are expressed as a percentage of the total flour weight.

Real life you are making your favorite loaf of bread and it always seems to be so sticky, and you have a problem with it falling when baked. Could it be the recipe? Is there to much water in the recipe? How can I tell?

Bread Recipe (example only)
Flour 511 g  (if using 2 types of flour add together for total flour)
salt 4 g
yeast 6 g
milk + water = 400 g  (if using 2 types of liquid add together for total liquid like this example)
honey 42 g  (even though this is liquid it's not enough to be added to the liquid total)
butter 28 g
   (melted butter is not enough to be added to the liquid total)

The only numbers we are concerned about are the flour (511 g) and the liquid (400 g) to find the hydration of the recipe. 

Formula   = Liquid  will give you the ratio of fluid to flour in the recipe
                    Flour
 
Recipe         Liquid 400 g  = .78    .78 x 100% = 78% hydration

                    Flour 511 g

So what does this mean that my bread has 78% hydration?
Every type of bread is best at a certain percentage; this recipe is at 78%, which is too wet if you are making loaf bread.
Loaf Bread should be 68 - 72% hydration
Artisan Bread has 75 -80% hydration, much more liquid, this causes the open holes in the finished bread.

The recipe needs adjusting but how much liquid do I decrease in the recipe to get to 72% hydration? Instead of guessing lets use math and get it correct the first time.

What do you know?
You want the bread to be 75% hydration ...we know that
You know the amount of flour in the recipe is 511 g
What you want to figure out is how much water do I need to add to the recipe?


75% (correct hydration)    75 g  or expressed as .75
                                        100 g


511 g flour x .75 =383.25 g water (is desired total water for recipe)

Therefore; in above recipe:
Replace milk + water = 400 g    to: milk +
water = 383 g

You can reduce the water only, milk only or a combination, as long as the total amount of liquid is no more than 383 g. This should correct your problem when making your bread. Go ahead and give it a try, adjust again if needed using the same formula.                                 


0 Comments

Baker's Percentage

1/12/2015

0 Comments

 
Most home bakers use a recipe to make bread which is made up of cups, tablespoons and other measurements. Most serious baker use a formula all of the ingredients are in one type of measurement like grams.There is  a difference between a recipe and a formula. A recipe can not be expand it to make 50 loafs the proportions will not work, but with a formula you can.

So what we are going to explore is the bakers formulas and the math involved to create that formula. This will open a whole new world of baking, not only bread but anything. 

The Demystifying of Baker’s Percentage
Contributed by Tim Healea

Why use it?

Let’s take a closer look at baker’s percentage and some of the features found in the standardized format. First, it is important to understand why baker’s percentage is so critical to success. Listed below are just some of the benefits gained by using baker’s percentage:
  • Consistent results. Measurements in baker’s percent are calculated by weight, ensuring consistent results on a day-to-day basis.
  • Flexibility. Baker’s percentage allows you to calculate exactly how much dough must be produced to meet specific production needs, while maintaining the correct ratios.
  • Ease in troubleshooting. Baker’s percentage can be used to quickly change hydration levels to account for changes in flour consistency and can also be used to identify problems in a formula (i.e., if it is not balanced or if certain ingredient amounts are too high or too low).
  • Fixing scaling errors. A baker can use baker’s percentage to calculate additional ingredients needed to maintain a consistent formula if one ingredient is scaled incorrectly.
  • Communication. Baker’s percentage is a common language to bakers. It can be used to share formulas in a concise, universally understood way — even if the spoken language isn’t the same.
Before we go into the formula lets talk a little about the important basic guidelines for using the baker's percentage.

1. All ingredients are measured by weight, including liquids; they should  be measured using a consistent unit of measure, for example grams or pounds.

2. The main ingredient in the formula is flour....it is always considered 100%. When two or more types of flours are used in the formula, their combined total is considered 100%.

3. The weights of all other ingredients are expressed as a percentage of the total flour weight.

4. Get to know Excel, spreadsheet programs are easy to use and can quickly calculate formulas.

TOTAL FORMULA % Quantity (kg)   (THIS IS JUST AN EXAMPLE NOT A TESTED RECIPE)
White flour .........................70.0
Whole wheat flour...............30.0
Water .................................80.0
Instant yeast ......................0.3
Salt ....................................2.0
Peanuts .............................5.0
Total .................................187.3 10.000 kg

Notice that there are two kinds of flour here white and whole wheat, and their sum is 100%. Also notice at the bottom of the percentage column, we have totaled all of the percentages that make up the formula. Now we can calculate the quantity of ingredients for a 10 kg batch of dough. Although there is more than one way to do the calculations, here is one simple way: 

First, calculate the amount of total flour. We start by dividing the total percentages (187.3%). by the total flour percentage (always 100%). That equals 1.873. Then divide the amount of dough you want, in this case 10kg by 1.873.


AMOUNT OF              amount of dough
TOTAL FLOUR       =   you want (10kg)
                          ________________
                           total of percentages/
                         total flour percent (100%)


TOTAL FLOUR     =    10kg
                              _________     = 5.339kg
                                  1.873

Subsequently, all of the ingredients amounts can be calculated by multiplying the percentage of each by the total flour weight. For instance:    

White flour = 5.339 x 70% = 3.737 kg
Whole wheat flour = 5.339 x 30% = 1.602 kg
Water = 5.339 x 80% = 4.271 kg

Note that the quantities are rounded to the thousandth, so that when using kilograms, the formula is accurate to the gram. The completed total formula would be:

TOTAL FORMULA % Quantity    (kg)
Flour .......................... 70.0        3.737
Whole wheat .............. 30.0         1.602
Water .........................80.0         4.271
Instant yeast .............. 0.3 0          .016
Salt ............................2.0           0.107
Peanuts ..................... 5.0           0.267
Total ....................... 187.3        10.000 kg

The calculations also work in reverse, so if you know the quantities of ingredients in a consistent weight, you can easily calculate the percentages of each ingredient. Remember, flour is always 100 percent, so just divide each ingredient by the total flour in the formula (in this case, 5,339 kg) to get the percentage of each corresponding ingredient.

Now, let's take the formula one step further and incorporate a preferment into the mix - in this case, a biga composed of whole wheat and white flour, with a hydration level of 65 percent. We will take a portion of the ingredients in our total formula and use them for our preferment. Let's say we want to use 33 percent of the total flour in the biga (1.762 kg), and for ease of scaling we will use all of the whole wheat flour, so we will need to add some additional white flour to the biga to use 33 percent of the total flour in the preferment.

We want to ferment the biga for 12 hours, and for our environmental conditions we will use a yeast percentage of 0.1 percent; because the whole wheat ferments more quickly than white flour alone, we will also add 0.5 percent salt to slightly inhibit the yeast activity. Our formula would begin to look as shown in Table 1. 

Table 1


Total Formula     %     Quantity (kg)      BIGA        %      Quantity (kg)

Flour                  70.0      3.737              Flour            9.0            0.160   

Whole wheat     30.0       1.602          Whole wheat   91.0          1.602

Water                 80.0       4.271              Water          65.0           1.145

Instant yeast      0.30       0.016          Instant yeast   0.10            .002

Salt                     2.0        0.107                Salt            0.5             0.009

Peanuts              5.0         0.267               Peanuts                                            
Total                187.3      10.000 kg          Total   165.6           2.918 kg

Notice that we started with the quantity of the whole wheat flour (1.602 kg) and added additional flour (0.160 kg) to make up the 33 percent of the  total flour fermented  in the biga (1.762 kg). Now we can use the total flour amount to finish  the calculations. For instances:

Percentage of white flour = 0.160/1.762 = 9%
Percentage of whole wheat flour = 1.602/1.762 = 91%
Amount of water = 1.762 x 65% = 1.145 kg
Amount of yeast = 1.762 x 0.1% = 0.002 kg
Amount of salt = 1.762 x 0.5% = 0.009 kg

Now, we need to add the last column for the final dough. We start with the ingredients in the total formula, subtract the ingredients that are already in the biga, and we are left with the quantity of ingredients that need to be incorporated in the final mixing of the dough as shown in Table 2.

For clarity, we suggest not calculating the percentages for the final dough, because they can be misleading and confusing, especially for those new to baker's percentage. They will not give an accurate picture of the total hydration in the formula, and they will give you a skewed picture of the amount of salt and yeast in the total formula, along with the percentage of the total flour fermented in the preferment, are the most important pieces of information to understanding and evaluating the formula.

Next Steps
Practice, practice practice. The best way to learn baker's percentage is to use it over and over until you are completely comfortable with it. As one great baker said: learn it, use it, live it. Take a formula expressed in percentages and calculate the amount of ingredients for various batch sizes, or take a formula in a baking book and figure out the percentage for each ingredient. Baker's percentage is the most powerful tool bakers have to consistently bake quality bread. 

TABLE 2 • Bread — 33 percent total flour fermented in biga
TOTAL FORMULA % Quantity (kg)              BIGA % Quantity (kg)
Flour ...........................    70.0 3.737    Flour ...........................  9.0 0.160
Whole wheat ................ 30.0 1.602     Whole wheat ................ 91.0 1.602
Water ...........................   80.0 4.271    Water .......................... .65.0 1.145
Instant yeast ................   0.3 0.016      Instant yeast ................  0.1 0.002
Salt ..............................   2.0 0.107       Salt ...................  .0.5 0.009
Peanuts .......................    5.0 0.267      Peanuts .......................
Biga .............................                         Biga .............................
Total .......................187.3 10.000 kg   Total .................. 165.6 2.918 kg

FINAL DOUGH Quantity (kg)
Flour ......................................... 3.577
Whole wheat .............................0.000
Water .........................................3.126
Instant yeast .............................0.014
Salt ............................................ 0.098
Peanuts .....................................0.267
Biga ........................................... 2.918
Total ........................................ 10.000 kg

0 Comments

Types of Pre-Fermentations

1/11/2015

0 Comments

 
                                                                                                                There are many ways to classify doughs. Breads made in one mixing cycle with no pre-fermets are classified as direct or straight doughs. Breads made with a pre-ferment are know as indirect or sponge breads. Working with whole grain pre-ferments are used to improve flavor, develop gluten, provide structure to the dough and stay fresh longer.

Bread gets its spongy consistency from fermentation—the interplay of flour, water, and yeast that begins when the water activates an enzyme contained in the flour that breaks down the starch and converts it to sugar. The yeast feeds on the sugar, growing and multiplying, and producing 2 essential by-products: alcohol and carbon dioxide. The alcohol adds flavor, while the bubbles of carbon dioxide "leaven," or raise, the dough and establish the bread's crumb or texture.

Pre-fermentation involves mixing part of the dough's flour, water, and yeast and allowing it to ferment before adding it to the rest of the dough. The use of a pre-ferment allows you to use less yeast because the pre-ferment kick-starts the fermentation process before the dough is actually mixed together.

Making a pre-ferment several hours before adding it to dough will give bread an extra depth of flavor, but if a pre-ferment is made one or even several days in advance, it will also add acidity. In small amounts, acidity extends the shelf life of bread, but in larger amounts, such as in the case of sourdough, it starts to affect the texture of bread, creating large holes in the crumb.

There are many types of pre-ferments but basically 2 categories wet or firm. Most Americans are use to a wet pre-ferment like a sour dough sponge. Europeans use more firm pre-ferments since they are easier to adapt in recipes. The pre-ferment is the same hydration (amount of liquid to flour ratio) as the final dough, which means it feels like the final dough when kneading.

Wet Pre-ferments (50% or more liquid to flour ratio)
  1. Poolish- a wet sponge, is easy to make and is best when made fresh each time you need it. It will, however, also be good for up to 3 days if stored in the refrigerator and can be frozen if you choose to do so. The flour and the water are the same weight and are mixed with a spoon.
  2. Levain- This is a French term used for a sour dough starter or a wild yeast starter. It mainly is a wet pre-ferment.
  3. Sourdough - The most common pre-ferment to home bakers in the U.S, it's usually wet. 

Firm Pre-ferment (less then 50% liquid to flour ratio)
  1. Biga- Is the Italian verson of a firm pre-ferment. A Biga has the same feeling as the finished    dough it includes a small amount of yeast and no salt. The biga is retarded overnight in the refrigerator or can be held for up to 3 days before it must be used.
  2. Pate Fermentee- The French version of a firm pre-ferment. The Pate Fermentee can be made in advance but more often it's a piece of dough from the bread baked the day before. The difference between a Biga and a Pate Fermentee is the addition of salt in the Pate Fermentee.
  3. Desem- An ancient style of sourdough developed by the Flemish a region of Belgium. Desem takes weeks to develop in a cool temperature. The flavor is more complex and less sour than a sour dough starter.
0 Comments

13 Stages of Bread Making

1/11/2015

0 Comments

 
1.    Everything in it's place; This reminds us that to make good bread it requires discipline and organization. Bread has few ingredients and those ingredients need to be properly measured or weighed in order to have a good outcome

2.    Pre-Fermentation;  Not all bread use a pre-fermentaion method in the recipe. Usually done in advance of baking, part of the flour is mixed with a liquid to allow the enzymes and gluten to start developing. Most of us are familiar with a sour dough starter this is a form of pre-fermentation.

3.    Mixing; This refers to the kneading, weather if be done by hand or machine the gluten needs to be developed to a windowpane or the bread will not raise properly.

4.    Bulk fermentation; Great bread really comes down to one skill, how to manipulate time and temperature to control the outcome. If one or the other is off the bread will suffer in the end. This is where the flavor of the bread is developed with the braking down of the sugars in the grain.

5.    Punching Down; Often called de-gasing, this allows for redistribution of the nutrients to the yeast and enzymes in the bread along with allowing the gluten to relax. Once the gluten is relaxed and the nutrients moved around the gluten will have greater stretch resulting in a higher loaf.

6.    Dividing; Is the preparation for the final product, the loaf or rolls each is weighed.

7.    Rounding; Stretches the gluten again and forms a tight surface tension or skin on the dough. This will help the dough to keep its shape during the final rise.

8.    Benching; Is another term for resting. This main purpose for this stage is to relax the gluten after it's workout. If the gluten is relaxed it will allow more stretch in the baking stage which means a nice oven spring.

9.    Shaping and Panning; The final shape is given to the dough. How well the dough is shaped will effect the final height of your loaf. Good shaping results in good internal structure for the dough.

10.    Proofing; Also called the second fermentation, time and temperature again are very critical. The food for the yeast is running low so don't over proof.

11.    Baking; If all went right with the above steps your loaf will have an oven spring. The first 10 minutes of baking are the most critical. This is when the bread  height is set before the temperature kills off the yeast.

12.    Cooling; Bread is best if it's cooled to room temperature before slicing into it. During the cooling the flavors are still intensifying and the moisture is stabilizing in the loaf.

13.    Storing and Eating; Lean bread can be stored at room temperature in paper but must be eaten within a day or two. Enriched bread are best store in plastic or frozen right away. Sandwich bread I find is best to cool, slice and freeze.

0 Comments
Forward>>

    Yeast Bread
    Education


    Archives

    December 2022
    May 2022
    April 2022
    July 2020
    April 2020
    March 2020
    February 2020
    July 2019
    March 2019
    August 2018
    June 2018
    January 2017
    April 2016
    October 2015
    July 2015
    February 2015
    January 2015

    Categories

    All
    English Muffins
    Flat Breads
    Hamburger Buns
    Making Yeast Bread
    Pizza Crust
    Rolls
    Understanding Ingredients
    Yeast

    RSS Feed

Powered by Create your own unique website with customizable templates.