Whole Grain 100
Email: wholegrain100@proton.me
  • Welcome
  • Price Sheet
  • Store & Classes
  • Baking Education
  • Recipes
  • Grain Education
  • Health & Nutrition

Dress Up Your Loaf With A Stencil

1/13/2015

2 Comments

 
PicturePicture From King Arthur's Flour Web Site
Stenciling your loaves is VERY easy. It will take your baking to a whole new level and make you look like a true artisan baker. It's funny how something so simple can create such awe from a table full of hungry people.

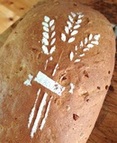
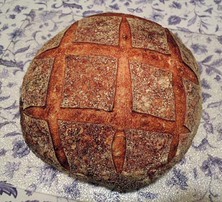
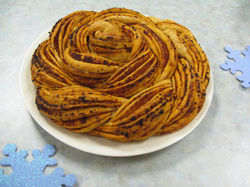
Stenciling involves placing a flat, patterned object (most commonly a leaf or flower) on top of your loaf, then dusting the loaf lightly with flour. When the stencil is removed, the pattern stays, and looks beautiful after the loaf is baked.

Here is the simple process:
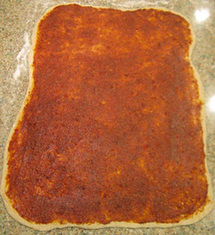
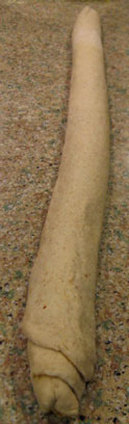
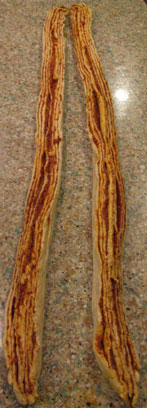
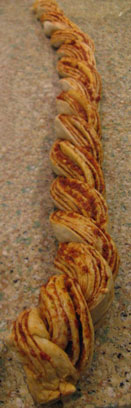
  • Follow your recipe through the final rise (proof).  At this point your bread should be shaped and in the pan (or on the sheet/stone) and ready for the oven.
  • Mist with a squirt gun to lightly dampen the surface of your bread.
  • Place the stencil on top of the moistened loaf.
  • Sprinkle the flour evenly across your stencil, as lightly or heavily as you prefer.
  • Remove the stencil carefully, and bake your bread.
Stencils are available on line for around $10.00 but you could make your own easily.

2 Comments

Glazing Your Baked Items

1/13/2015

1 Comment

 
Glazing adds that finishing touch to your pastry or freshly baked bread. Not only does glazing make your bread look more appealing. It can seal in the freshness of the bread, create a soft crust, and warm hue, or just make it shine. It all depends on what type of glaze you choose. Below is a list of common glazes and their effects on  breads so you can make a decision on which is best for your baked item.

You can apply the glaze before baking, the last 5-10 minutes of baking or even after it's right out of the oven. Whenever you decide to apply the glaze you will need a soft brush. I like the silicone pastry brushes because they are soft but can be washed in the dishwasher.

Basic Egg Washes
This gives a glossy, golden look to the crust. It also makes a good 'glue' if you are applying seeds or any type of toppings to the bread. Glazes made with raw eggs are applied before baking or the last 5-10 minutes of the bake. That way the egg will have time to cook when applied to the loaf.
I usually do mine the last 10 minutes of the bake.
  • For a clear shiny finish use only the egg white of a large egg  with 1 tablespoon cold water. Apply the last 5 - 10 minutes of the bake.
  • For a golden sheen, use 1 whole egg beaten with a teaspoon of water, (you may use milk or cream for a deeper colored crust)
 
Milk Glaze
Using a milk glaze is simple, it will give a rich color and slight shine with a mild sweet taste. The end result in my experience using the milk is the crust will have not as deep a color as the egg washes or as glossy a finish.
  • Brush the loaf with milk or cream for a deeper color before the bread is put into the oven. It will also work if applied the last 5 -10 minutes of the bake.

Cornstarch Glaze
This glaze is normally used on Rye breads but will work on any kind of loaf. This glaze seals the loaf and gives it a high shine.
  • Stir 1/2 tsp. cornstarch into 1/4 cup of cold water. Boil for a few  minutes, or until it becomes completely clear.
I usually do mine is a small glass bowl in the microwave but you could double the recipe and keep it in the refrigerator up to a week. Brush the loaves the last 10 minutes of the bake and again right before you take them out of the oven.

Butter Glaze
Butter glaze is all about the taste. If you want a soft crust and glow with added flavor brush the top of your rolls or loaf with melted butter after baking. If you want a higher gloss with the butter flavor. Use an egg glaze before baking and the melted butter after baking.

Sweet Glaze or Icing Yields: 1/2 cup
  • 1 cup powdered sugar
  • 2 tablespoons milk
  •  1/4 teaspoon Vanilla Extract
    In a small bowl, combine the sugar, milk and vanilla. Stir until smooth. Let stand for 5 minutes to thicken. Drizzle over bread. Let the glaze dry 20 minutes to set.
This recipe will set up quickly and be solid enough for transportation.

Happy Baking! Tamara
1 Comment

How To Shape A Boule

1/12/2015

0 Comments

 
You want something special for Thanksgiving but don't want the extra stress of trying out a new recipe, why not use your favorite bread recipe and use a different shaping technique.
Boule
A boule is easy and impressive for the table. If you have a proofing basket dust it evenly  with flour, then shape your dough following the directions below. Let the dough proof until it reaches the top of the basket. Turn the proofed dough onto a cookie sheet or stone to bake and this is what it will look like. If you don't have a proofing basket use a round casserole dish or just proof the dough on the cookie sheet then bake. Using the folding technique below will ensure a tight boule which will make it hold it's shape better when baking.

 I carry Proofing Baskets....$15.00 Read More
Picture
Finished Boule using the proofing basket in the picture.
Picture
0 Comments

Easter Bunny Rolls

1/12/2015

0 Comments

 
There are many times I will make rolls instead of a loaf of bread because basically they are more versatile and easy to freeze. With just the two of us a loaf is more than we need since we very seldom eat sandwiches.  When you make rolls you don't have to make them all the same you can stuff some of them with herbs,  onions, olives or even something sweet like a  cinnamon and sugar mixture. So with just one recipe I can make hamburger  buns, a few sweet rolls for breakfast and the rest of the rolls for eating with our soup at lunch.

It's always been a question  how big should I make them or how much should a roll weigh? Since this is whole grain it can fill you up and the rolls can be smaller and still satisfy your hunger. This is just a guideline to give you an idea on the weights of different types of rolls.

Basic weights of rolls
12" Hoagie/sandwich roll: 227g
6" - 7" Hoagie/sandwich roll: 113g
Burger & hot dog buns:  75g -92g
Medium dinner roll: 70g
Small soft dinner roll: 48g
Picture
Fun Shape For Easter
This couldn't be easier, make a simple round roll and with your scissors at an angle clip the ears.  You can add raisin eyes and after they bake use rosemary for the whiskers. They are cute in the bread basket on the table for a special dinner with family.
These should weigh between 70g to 48g for a smaller roll.

Picture
Twisted Bunny Rolls
Take your dough and make a long snake about 10 inches then fold it in half and twist the two ends together. Make a small round ball and place it into the loop and there you have it. It doesn't have to be perfect you are going to eat it, so let the kids have fun and make bunnies for the Easter Dinner they will taste good no matter what they look like. I would make these weigh around 75g not to much larger because you want to have room for everything else on the table.
0 Comments

Scoring

1/12/2015

0 Comments

 
What is scoring?
“Scoring” is the word used to describe the cuts made in a loaf of bread before it's baked. Some breads are not scored. For example many loaves baked in pans are not scored. However, almost all free-formed “hearth breads” are scored.

When is scoring done?

Scoring is generally performed just prior to loading the loaves in the oven. French rye breads (pains de siegle) are sometimes scored right after shaping,  before proofing.

Why are breads scored?

Intentionally creating a weak spot on the surface of the loaf  so the loaf will open up at the at weak spots creating a pattern on the loaf.

The type of scoring performed controls the direction in which the bread will expand during “oven spring.”
The pattern of cuts made, the angle at which they are made and the depth of the cuts influences the rate of expansion and the formation of an “ear” - a raised flap of crust at the edge of a cut.

The pattern of cuts can create a pleasing visual pattern on the surface of the loaf. While there are some very traditional patterns, for example on baguettes, the baker can use the scoring pattern to identify the type of bread or to create an unique pattern that identifies the loaf as coming from his or her oven.

The effects of scoring on loaf shape are discussed in more detail below.

What do you use to score bread?
The blade used to score bread is often referred to as a lame (pronounced “lahm.”) This is simply a French word with means “blade.” Breads may be scored with straight or curved razor blades, either held in the hand or mounted on a handle. Scoring may be performed with other sharp, straight blades, even with a straight razor. Some bakers prefer serrated blades.

For some types of scoring, a straight blade is preferred. Straight bladed knives are preferred for cuts made with the blade held perpendicular to the loaf's surface. This sort of cut is generally used for round loaves (“boules”). For other types of scoring, a curved blade works better. Curved lames are generally used for long breads like baguettes which are scored with cuts parallel to the long axis of the loaf.

How are the cuts made?
The scoring stroke should be firm, rapid, smooth and decisive. For the beginner, it may help to take “practice swings” or to visualize the movements and totally focus one's attention before making the cuts. Understanding the functions of scoring and the effects of the variables described can help, but there is no substitute for experience. In this respect, scoring bread is no different from an athletic skill or any other art or craft.

The cuts should generally be 1/4 to 1/2 inch deep. A wet, sticky dough requires a more shallow cut than one would make in a dryer dough.

Scoring a Boule (round loaf)
The angle of the blade or knife in relation with the surface of the loaf is important in determining how the cut will open up. If you want the cuts to spread equally and quickly as is traditional with round loaves (boules), the knife should be held vertically – at 90 degrees to the surface of the loaf.
Picture
Tic Tac Toe Pattern on a Boule
Picture
Diamond Pattern on a Boule
Picture
Boules are scored in a variety of patterns with differing effects on how the loaf expands. The common "tic-tac-toe" pattern and a simple cross will direct the expansion upward. More complex patterns like diamonds result in a relatively flatter loaf.

One of the most interesting effects is that scoring a boule with multiple parallel cuts encourages expansion at a right angle to the cuts. This results in an oblong loaf shape.

Scoring a long loaf (bâtard)
If you want the cuts to spread more slowly and create an “ear,” as is generally desired with long loaves (baguettes and bâtards), the knife blade should be held at a shallow angle with the surface of the loaf, at about 20-30 degrees or so. Many find using a curved blade helps make this type of cut. The blade is held with the concave surface facing up (away from the loaf). A flap of dough is created that will lift up to create an “ear” as the loaf expands and lifts gradually. This prolongs the time during which new areas of dough are exposed to the direct heat of the oven and results in greater overall expansion – a larger “bloom,” or higher loaf.
Picture
Baguettes
Michael Suas, in his book "Advanced Bread & Pastry," provides some information about how scoring patterns influence loaf shape. Scoring is not just to make a visually pretty design on the top of a loaf. It is also allows the baker to control the direction in which the loaf expands. This impacts the shape of the loaf cross section (rounder or more oval), the height of the loaf and, for a boule, whether it stays round or ends up more oblong.

According to Suas, long loaves like bâtards and baguettes are traditionally scored parallel to their long axis. This may be a single long cut or multiple cuts that are almost parallel and overlap somewhat (for ¼ to 1/3 of their length, generally). This pattern promotes sideways expansion of the loaf, resulting in an oval cross section when the loaf is sliced.
Picture
Picture
Picture
In summary, in order to achieve an optimal bloom in baguettes and bâtards, one must attend to 3 variables when scoring them:
  1. The cuts should be almost parallel to the long axis of the loaf.
  2. The blade should be held at about a 30 degree angle to the surface of the loaf.
  3. The depth of the cut should be shallow - about 1/4 inch.
Variable shading of the bloomed crust confirms that the desired slow but prolonged opening of the cut during oven spring occurred.

A final word
This has focused on the mechanics of scoring, but the other steps in bread making impact the behavior of the cuts you make and the final appearance of your loaves. In fact, every single step, from your choice of ingredients and their proportions – your formula – to how you steam, and even your oven plays a role in how your cuts will open. Your best looking loaves will result from a series of choices that are mutually dependent, where and  how you score a loaf takes into account the other choices you have made about the formula, mixing, fermentation, shaping, proofing and baking.

Basted on an article by David from the Fresh Loaf Blog
0 Comments

Rose Technique 

1/12/2015

0 Comments

 
Picture
Tomato Pesto Rose
This technique is easy and very impressive. You can use it for sweet breads or a savory bread like the picture.  Make your favorite bread recipe but, instead shape the dough into one large rose and serve it sliced like a cake.

Recipe:  Sun-Dried Tomato Pesto (makes more than you will need for the rose bread)

Place in food processor and process until you have a smooth paste:
1 c. sun-dried tomatoes (preserved in oil,  drain very well)
2 cloves garlic, crushed
1/4 c. sliced almonds
2 T. chopped parsley
1/8 to 1/4 c. grated asiago or parmesan cheese

Than Add to the processor:

1 T. olive oil,
1/2 tsp. kosher salt
3 drops Tabasco sauce
1/2 c. real mayonnaise.
Process again until smooth. Adjust salt to taste. Transfer to bowl, cover and refrigerate until ready to use.
Roll out 15"x20"
Cover with 190g of pesto
Leaving a clean 1/4 inch border
around the edge
Roll Up like a jelly roll
from the long side (20 inches)
Picture
Roll Out 15" x 20" Inches
Picture
Roll up like a jelly roll from the long (20") side
Picture
Cut the jelly roll in half
Keep the cut sides up so the filling does not fall out.

Lay one on top of the other forming an X shape keeping the cut sides facing up.
Picture
Twist the 2 halves together
Gently twist the two together into one large rope.

Starting at one end, coil to  form a circle. Place on a cookie sheet.

I removed the bottom of a spring form pan and slip the circle ring over the dough. It will fill out when it's proofed.

This will give the dough support if you don't want it to spread.

You don't have to do this, but the rose loaf will be larger and flatter without the ring for support.
Proof: About 30 - 40 minutes until it barely springs back when lightly touched.

 Bake at 350 degrees for 25-30 minutes, or until 195 degrees (internal temperature) is reached, turning loaf for even browning or covering with foil to prevent over browning, if needed.
Picture
The pesto is through out the entire bread, which gives you a lovely color and crumb.

Use different fillings
An herb filling would work, also a sweet filling like that of a cinnamon roll is nice. Fruits, could also work as long as they are not to wet. The filling should not affect the moisture level of the bread or be to thin or it will run out during the baking process.
0 Comments

    Yeast Bread
    Education


    Archives

    July 2019
    November 2015
    August 2015
    January 2015

    Categories

    All
    Loaf Size
    Pretty Loaves
    Pretty Loaves
    Shaping & Scoring
    Shaping & Scoring

    RSS Feed

Powered by Create your own unique website with customizable templates.