Whole Grain 100
Email: [email protected]
  • Welcome
  • Price Sheet
  • Store & Classes
  • Baking Education
  • Recipes
  • Grain Education
  • Health & Nutrition

Carrot Layer Cake

3/17/2022

0 Comments

 
Carrot cake is an American classic. This recipe makes the humble carrot cake  into a four-tier, nut-crusted confection that will be the center piece of the celebration. The cake will be baked in a half sheet pan, that way you don't have to cut the layers and the cooking and cooling times are reduced. This recipe is based on a recipe from the American's Test Kitchen. This technique can be used for many cakes.

Oven: 350
Time: 15-18 minutes
Pan: 18 x 13 inch rimmed baking sheet lined with parchment paper
Cake Ingredients:
236g of soft white flour (1 3/4 cups)
2 tsp. baking powder
1 tsp. baking soda
1 1/2 tsp.  ground cinnamon
3/4 tsp. ground nutmeg
1/2 tsp. ground ginger
1/2 tsp. salt
1/4 tsp. cloves

236g light brown sugar (1 1/4 cups)
168g vegetable oil (3/4 cup)
3 large eggs
1 tsp vanilla extract
2 2/3 cup carrots (4 carrots)
2/3 cup raisins

Cake Directions:
  • Shred the carrots using food processor or grater box
  • Mix dry ingredients together; flour baking powder, soda, spices in a large bowl.
  • Whisk Sugar, oil, eggs and vanilla together in a second bowl until the mixture is smooth. Stir in the carrots and raisins.
  • Add the flour mixture and fold with a spatula until mixture is just combined. Let it sit for 15 minutes
  • Transfer the batter to the baking sheet lined with parchment paper. Smooth the batter with an offset spatula. Bake until the center of the cake is firm to the touch 15-18 minutes. Cool 5 minutes and invert the cake onto a wire rack DO NOT remove the parchment paper. Then reinvert it onto a second wire rack to flip it over and cool completely.
Frosting:
340g powdered sugar (3 cups)
227g  unsalted butter (16 T.)
40g DRY buttermilk powder (1/3 cup) ... This gives the frosting a nice tang
2 tsp. vanilla extract
1/4 tsp. salt
12 ounces cream cheese chilled and cut into 12 equal pieces
227g pecans  toasted and chopped coarse (2 cups)

Frosting Directions:
  • Using a mixer, beat on low speed, the sugar, butter, buttermilk powder, vanilla and salt together until smooth. 
  • Increase the speed and add the pieces of cream cheese one at a time mix until  smooth.

Assembly:
  • Transfer the cooled cake to the cutting board, with the parchment paper attached side down. 
  • Cut the cake and parchment in half crosswise, then lengthwise into 4 even quarters.
  • Make a 6x8 piece of card board wrapped with wax paper or foil placed on a cake platter.
  • Place 1 cake layer, parchment side up, on the cardboard and carefully remove the parchment. Spread 2/3 of a cup of the frosting to the edge  of the cake. Repeat with 2 more layers of cake and frosting. Press lightly to make sure they adhere to each other. 
  • Top with the last layer and spread 1 cup of frosting evenly over the top. Spread the remain frosting evenly over the sides of the cake. 
  • Add chopped nuts to the side of the cake by gently pressing them to the icing with your hands.
  • Refrigerate for up to 24 hours before serving.

​ Enjoy!
0 Comments

Perfect Upside-Down Cakes

10/14/2015

0 Comments

 
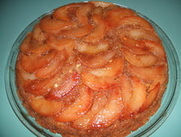
PictureSpicy Pear Upside-Down Cake
I'm not sure why I love upside-down cakes, maybe it's the caramelized sugar and fruit on top, or just their simplicity. You can turn almost any recipe into an upside-down cake. There are a few types of cakes that will not work, for example an angel food cake or chiffon cake are to delicate to support the weight of the fruit topping. Also a flourless cake is not the best option. But any kind or yellow, spice or pound cake will work. If your recipe is a layered cake cut the batter ingredients in half so it makes a single layer.

The simple magic of caramelized fruit works with pears, apples, peaches, plums, oranges, berries, banana, cranberries, and pineapples. In the bottom of a 10 inch cast iron skillet melt 1/2 c. butter (113g) and 2/3 c. sugar (145g). As the butter melts combine it with the sugar. At this point you may add 1/2 tsp cinnamon, ginger, nutmeg what ever you think will go with your selection of fruit. Then add the thinly sliced apples, pears or your fruit of choice. Arrange the fruit slices decoratively in the skillet. Cook the mixture, undisturbed for about 25 minutes or until the fruit is tender and the sugar is a golden caramel color and thick.

Nuts also work as a caramelized topping. Consider adding nuts to your fruit, or skip the fruit entirely and just go with the nuts. For a cake that has fruit in the batter already, like a banana cake, a topping of caramelized nuts would be tasty.

Then pour the cake batter over the caramelized fruit or nut mixture, being careful not to disturb the arranged fruit. Bake according to the cake directions for time and temperature. When done you need to flip it to reveal the decorative caramelized fruit topping.

Timing is critical in order get a good looking topping. You want the cake pan to be cool enough to not burn you when you flip it, but still warm enough that the caramelized fruit will release easily from the bottom of the pan.

Let it cool on a wire rack for at least 10 minutes and up to half an hour, then lay a flat plate over the top of the cake pan. Carefully flip the cake over onto the plate. Bang on the bottom of the pan for good measure, then lift the pan straight up and off. If a few pieces of fruit decide not to leave the pan, don't worry; just peel them off and arrange them back into the topping. Since the cake is still warm, they'll re-congeal just fine. This is another reason not to wait to flip your cake until it's cooled completely.

I have 2 upside-down cake recipes on my blog for you to try.
Spicy Pear Upside-Down Cake
Cranberry Upside-Down Cake

Source:
Epicurious; Turn Your Cakes Upside-Down
Anna Stockwell


0 Comments

10 Tips For Better Baked Goods

7/21/2015

0 Comments

 
When it comes to baking, you need to play by the rules. Baking is more of a science that requires precision, and timing. For flakier pie crusts, moister cakes, and chewier cookies, there are just some rules that can’t be broken. If you follow these 10 rules your sure to have a better baked product.

1. Use Room-Temperature Ingredients
Many baked goods start by creaming together butter and sugar, which is made easier with gently warmed  ingredients. The more important reason the butter needs to be at room temperature is, it allows the sugar to aerate the butter properly, which results in a lighter product.

2. Invest in Quality Bakeware

I am always looking to save money but you get what you pay for in bakeware. Ask your husband, to do a great job you need good tools. Flimsy, thin pans and sheet trays won’t conduct heat efficiently, causing your cake, pie, cookies, or pastries to bake unevenly.

3. Butter and Flour Your Pans Generously
 When a recipe calls for a greased and/or floured pan, it’s for a reason. Your batter or dough has the potential to bake on and adhere to the pan.   Be generous and thorough with your application,  get into corners and at the seams where the bottom and sides meet.

If you’re also flouring a pan, add in more than enough to cover, tip the pan to coat completely, then tap out the excess. Be careful where you hold it—finger marks on the interior leave the pan exposed, and are opportunities for the batter to stick.

4. Weigh Ingredients
I weight out everything, and once you get use to doing this, you will save so much time and labor on washing dishes. Weighing out the ingredients eliminates potential for error.  A cup of flour measured in volume, for example, can vary as much as five ounces,which means the difference between buttery and flaky or and dense and cakey. A good digital scale will cost you about $20.00 and eliminates all the guesswork. 

5. Toss the Old Stuff
The majority of ingredients used in baked goods, like baking soda, baking powder and yeast, have a relatively short shelf life.  purchase them in small quantities so they don’t sit in your cupboard and go bad. If you’re not sure how fresh an ingredient is, either simply buy a new one or test it. To check the freshness of baking powder, pour boiling water over a small quantity—if it bubbles, it’s still fresh. Flour should smell fresh and feel light, not chalky; and fresh yeast dissolved in warm (110-115˚) water will bubble slightly after a few minutes.

6. Take Your Time to Fully Complete Each Step
There is a reason for the ingredients added in a certain order. It’s important to take the time to follow the instructions in the order they’re given. A good example is creaming together butter and sugar with a handheld or stand mixer. This should be done before the addition of the wetter ingredients, like eggs. The reason is the fat in butter holds air, and, when whipped or creamed. In this process, sharp sugar granules slice through the butter, creating air pockets that ultimately give the baked goods lift. Skip this step (or do it half-heartedly) and your end result will be dense and heavy.

Pay special attention to key instructions like “cream until light and fluffy,” “mix until just combined,” and “fold in gently.” Over mixing will develop the gluten and deflate the air pockets. Most of the time sifting is not needed. I do sift the baking powder and soda into the bowl because nothing is worse then getting a bite of baking soda in you muffin.

7. Use Salt
The half teaspoon of salt added to two dozen cookies won’t set you over your daily allotment, but leaving it out will drastically change the taste of the cookie. Salt isn’t necessarily in a recipe to make it taste salty it’s there to keep the baked good from tasting flat. Salt makes other ingredients, like vanilla, almond, lemon, and sugar come alive.

8. Rotate Halfway Through
Every oven has a hot spot, and if you don’t correct for it, you run the risk of unevenly baked goods When a recipe calls for turning a baking sheet or pan 180 degrees halfway through the process, don’t ignore it. If the back of your oven is hotter than the front, you need to give every corner and side of your baked item the same treatment. Don’t, however, open the oven constantly to check on progress, it’ll lower the temperature and alter the baking time.

9. Don’t Mess with the Oven Temperature and Cooking Time
  If a recipe for custard calls for an hour at 300 degrees but you’re pressed for time, don’t tweak it to 30 minutes at 425: It won’t be as silky or luxuriously creamy. Cakes especially lose moisture when cooked hard and fast, and you also run the risk of burning more delicate ingredients, like an almond-meal crust.

Find out if your oven runs hot or cold. If  it’s consistently 25 degrees colder than what you set it at, adjust accordingly. A thermometer that lives inside your oven will eliminate any guessing. Also important is that you set and use a timer. I could not live with out mine, they are cheap and you can use them for many other reminders like taking your medication at the correct time.

10. Let It Cool Completely
If you’ve taken the proper steps when buttering and flouring the pan you should have no problem removing it once it’s properly cooled. Some desserts and pastries must be removed from their pans as soon as they come out of the oven. Others, like a fragile chiffon cake, need to settle and cool completely before being handled.

Baking is a science and if you follow these simple tips your baked goods will be top notch every time.
0 Comments

Mixing The Perfect Cake Batter

1/19/2015

0 Comments

 
Creaming Method
There are 4 types of mixing methods, and the amount of fat used determines the method used for mixing the cake This directly effects the cakes volume. The most common method is the Creaming Method also known as the conventional method, the original method for butter cakes. This  method makes the lightest cakes. Use room temperature stick butter or solid shortening and regular or brown sugar.

1) In this method, the sugar and the fats are blended together first and then creamed utilizing a paddle attachment on your stand mixer. If a batter is creamed at too high of a speed it can actually reduce or destroy air cells. It's important to start on low speed until all  of the ingredients have been incorporated, then switch to medium speed. Making sure to scrape the bowl down periodically so all the ingredients have been thoroughly mixed in.

2) Add one whole egg at a time and beat until fully incorporated after each addition, about 2 minutes each. Scrape down the dry ingredients.

This is done in the following steps:
a. Add 1/3 of the dry ingredients to the mixture. Mix just until blended in.

b. Next add 1/2 of the liquid ingredients to the mixture. Mix just until blinded in.


c. Repeat adding 1/3 dry ingredients to the mixture, mix then add the last 1/2 of the liquids and mix until just blended.

d. Finally add the last 1/3 of the dry ingredients and mix, scrape down the sides and bottom of the bowl, Do not over mix, it will toughen the cake.

Put the batter into the prepared pan and bake following the directions on the recipe.
0 Comments

    Archives

    March 2022
    September 2018
    February 2018
    January 2017
    December 2016
    August 2016
    July 2016
    May 2016
    April 2016
    March 2016
    October 2015
    September 2015
    July 2015
    June 2015
    April 2015
    January 2015

    Baking Education

    Quick Breads
    Cakes & Cookies


    Categories

    All
    Biscuits
    Cakes
    Convert Recipes
    Cookies
    Ingredients
    Mixing Methods
    Muffins
    Quick Bread Loaf
    Scones
    Waffles

    RSS Feed

Powered by Create your own unique website with customizable templates.